
GraphQL for Beginners: Setting Up GraphQL Server
Welcome back to GraphQL for Beginners! A beginner-friendly series introducing the basic concepts of GraphQL and how to connect it to a front-end framework like React using Apollo.
In this part, we will start building a GraphQL server for a simple chat app with React and Apollo Client.
Sneak Peek: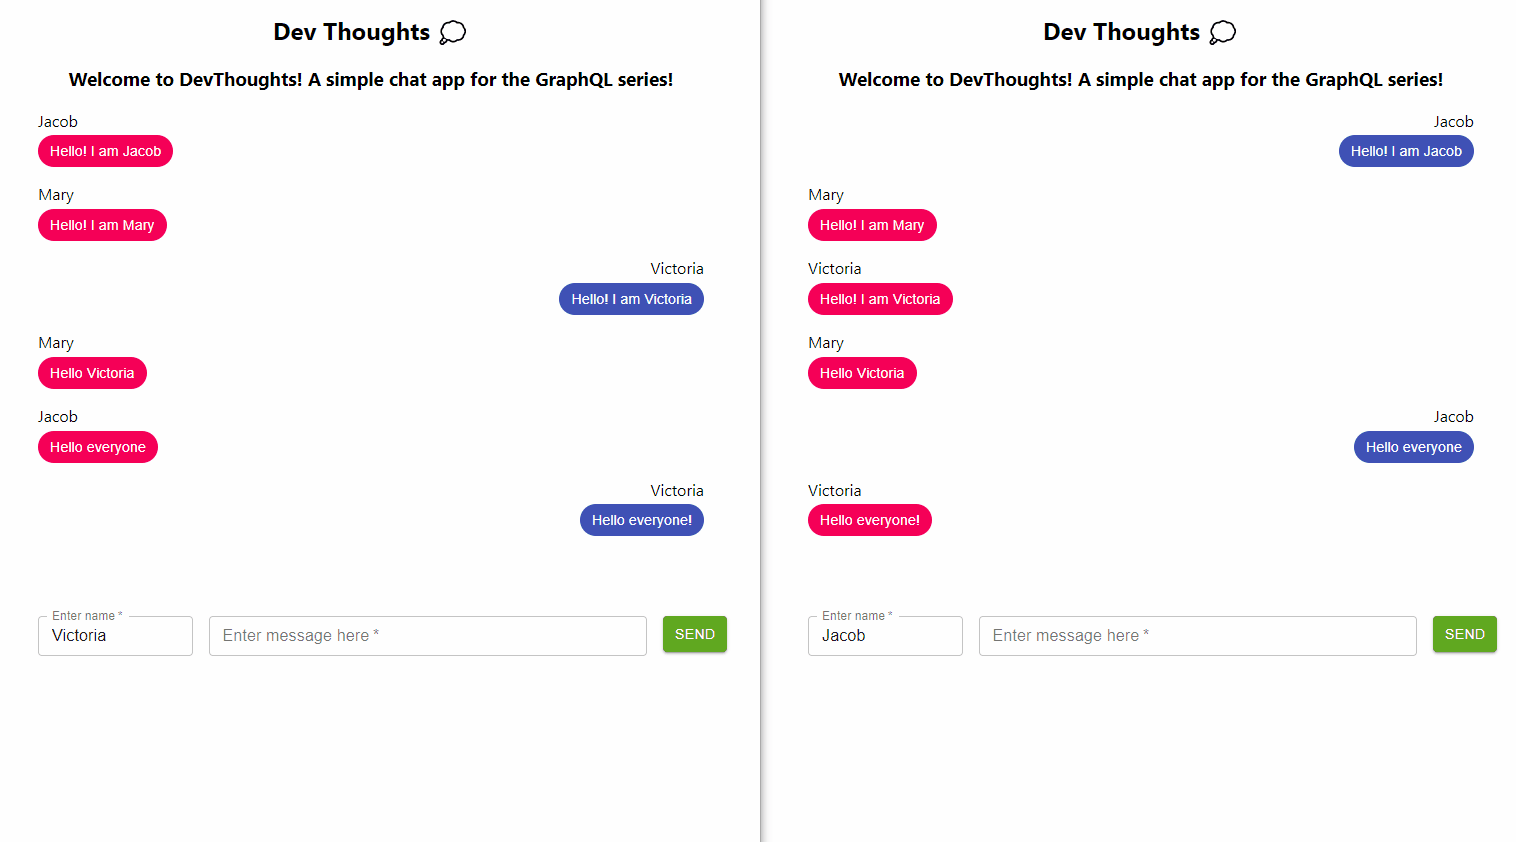
If you haven't read the previous part, please read it here.
Setting up GraphQL Server
First, we need a GraphQL server to receive and send queries to our client.
To recap about GraphQL servers, feel free to read Part 2 of the series.
Step 1: Initialize project
Make sure you have Node.js installed on your machine. If not, install it here.
Then, create a new project with the following commands in the terminal:
mkdir project   // create project folder
mkdir project/server    // create server folder
cd project/server    // move to server folder
npm init    // create package.json in the server folder
Your current project folder should look something like this:
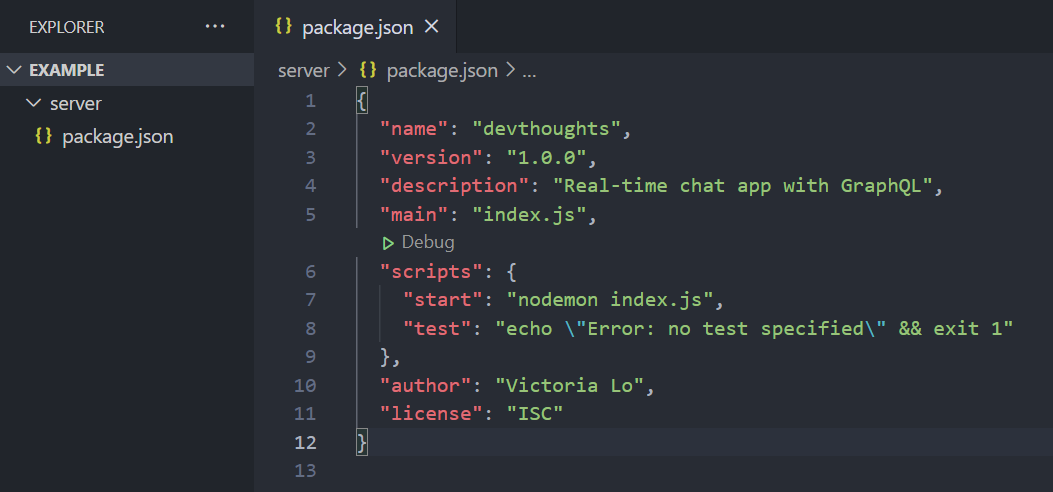
As shown in the screenshot, I went ahead and added the "start": nodemon index.js command under scripts. This is so that I can run the server with nodemon by just running npm start.
Step 2: Install package
In this tutorial, we will set up a GraphQL server with graphql-yoga.
It's easy to set up and includes built-in support for subscriptions with Websockets, which we will need for our chat app.
Make sure our current directory is the server folder. Let's install it with the command:
npm install graphql-yoga
Step 3: index.js and Schema
Then, create a index.js file in the server folder.
touch index.js
This is the entry point where we will set up our GraphQL server in. At the top on index.js, let's import the graphql-yoga package we installed earlier.
const { GraphQLServer } = require("graphql-yoga");
Next, we can define our GraphQL schema by creating type definitions:
const typeDefs = `
  type Message {
    id: ID!
    user: String!
    text: String!
  }
  type Query {
    messages: [Message!]
  }
  type Mutation {
    postMessage(user: String!, text: String!): ID!
  }
  type Subscription {
    messages: [Message!]
  }
`;
If you need a recap on schemas, feel free to read this article.
In the above schema, we have an object type called Message with the id, user and text fields. This object type will be the messages that we send and receive on this app. id is a unique identifier for each message. The user will simply be the name of the sender and text is the content of the message.
Next, we have a Query type in order to get all the messages. The query messages will return an array of the Message type, as indicated by the square brackets.
Below our Query type, we have a Mutation type to allow users to send messages in the app. The postMessage mutation takes in 2 required arguments: user and text, then returns the id of the newly posted message.
Finally, we have a Subscription type, which listens to changes in messages and returns an array of all the Message types when there is a change. This lets us update the UI in real-time once a new message has been sent.
Step 4: PubSub
graphql-yoga includes PubSub, a class that exposes a simple publish and subscribe API. This is needed to implement our Subscription type.
First, let's include it at the top of index.js, then create a new PubSub instance.
const { GraphQLServer, PubSub /*add this*/ } = require("graphql-yoga");

//create new instance
const pubsub = new PubSub();
Step 5: Resolver Functions
As mentioned in the previous part of this series, resolver functions are the logic that determines how the schema retrieves and returns data. You can think of the schema as the structure of the GraphQL API while the resolver functions implements the behaviour of the API.
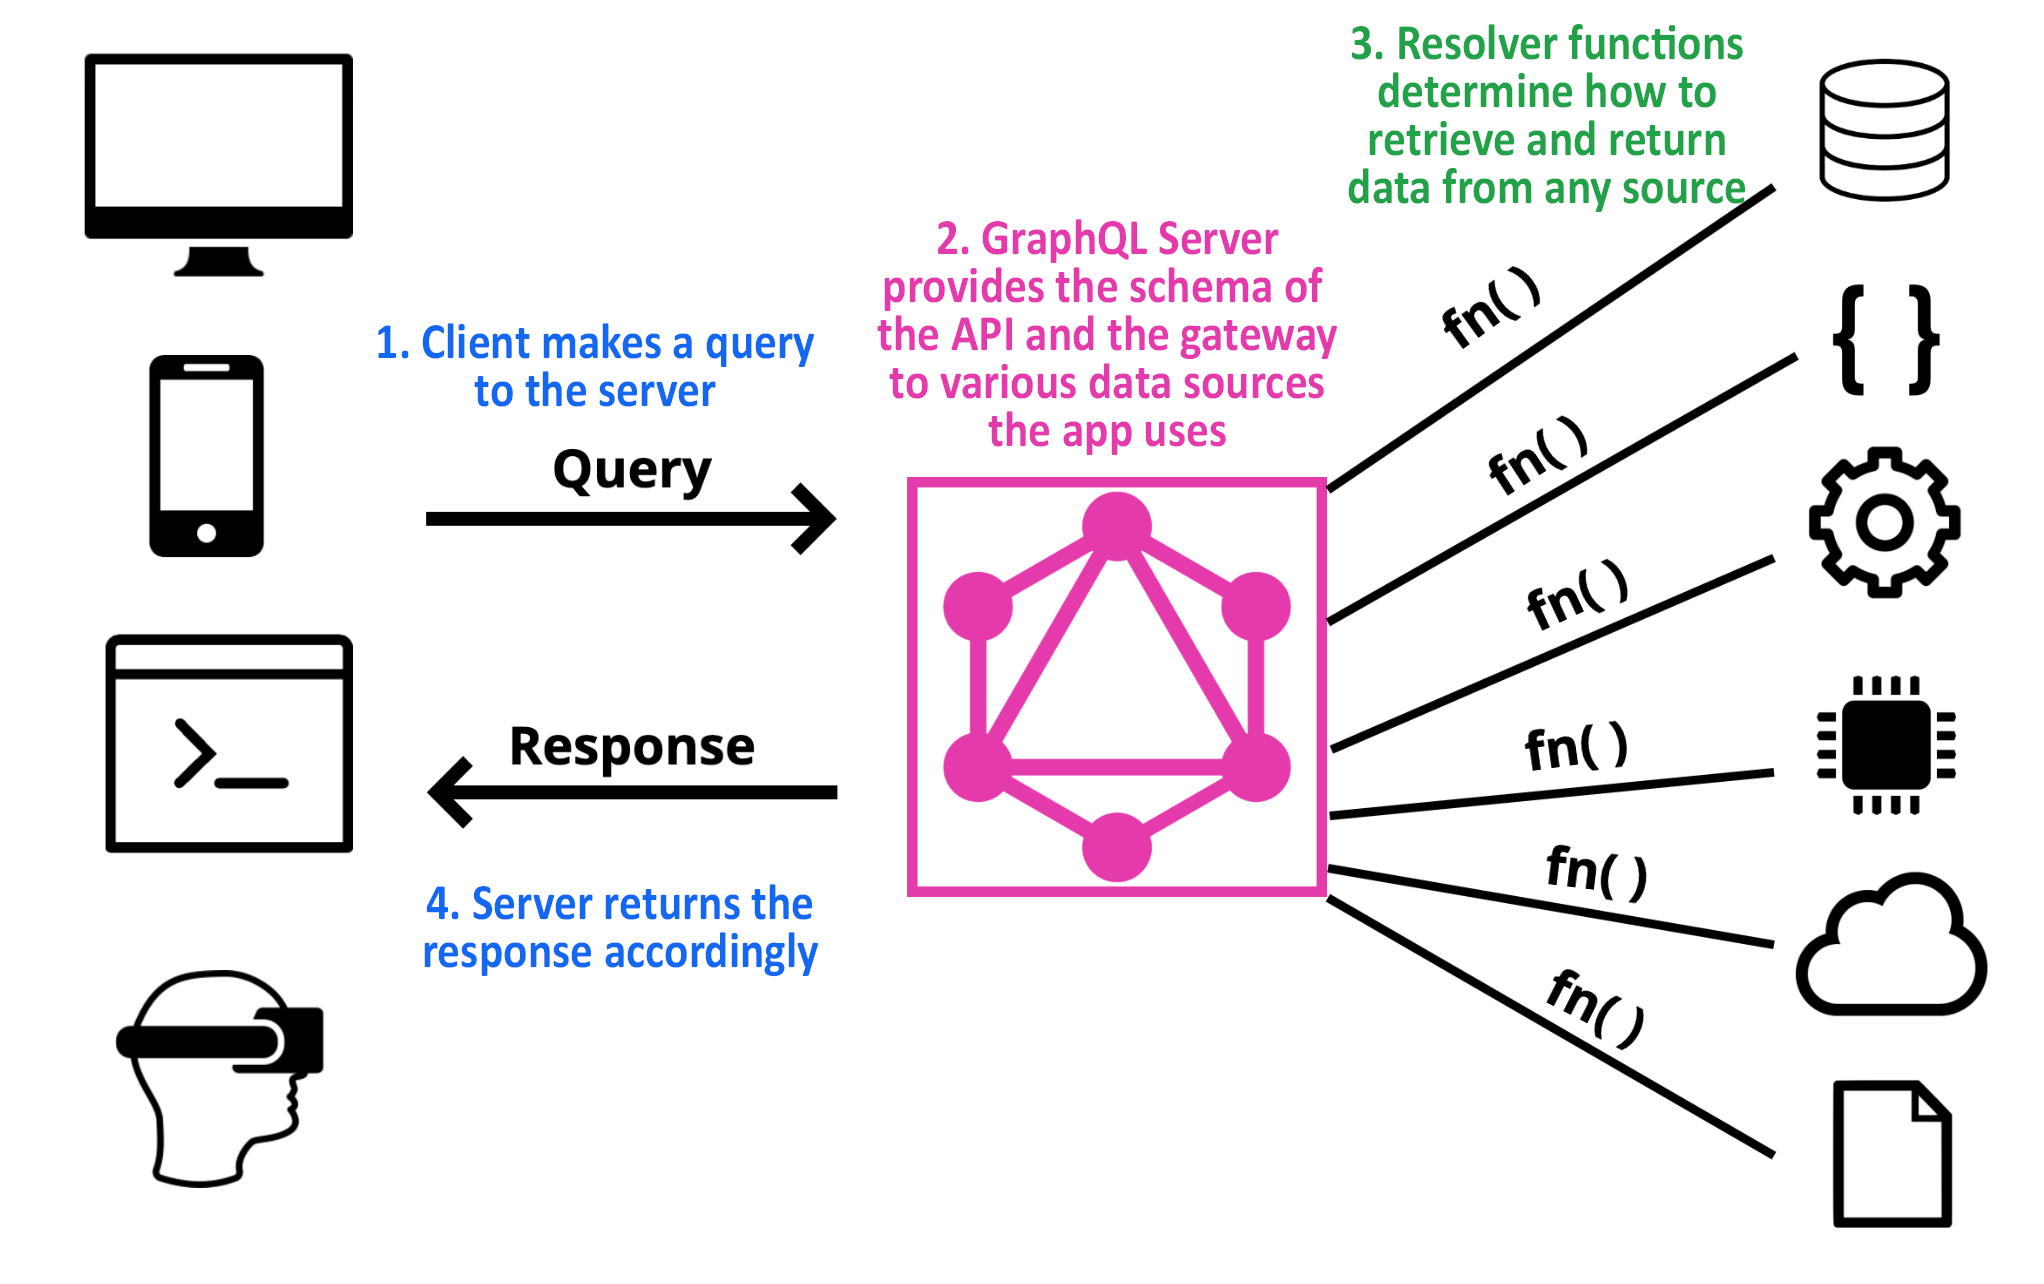
We need to write a resolver function for each Query, Mutation and Subscription type in order to instruct the server how to get, post and listen to changes in data.
First, let's create some variables to store our messages and subscribers data.
const messages = []; //stores all the messages sent
const subscribers = []; //stores any new messages sent upon listening

//to push new users to the subscribers array
const onMessagesUpdates = (fn) => subscribers.push(fn);
Next, we create the resolver object that contains all the resolver functions.
const resolvers = {
  //add all the resolver functions here
}
Anatomy of Resolver functions
Let's write our first resolver function! Before we proceed, let's talk about the anatomy of a resolver function. It can take in 4 arguments:
resolver_name: (parent, args, context, info) => {
          return something;
        },
1. parent
The first argument in the resolver function is parent (sometimes called root). This parent refers to the root or the previous resolver execution of the operation. What does this mean?
If you need a recap on the syntax of GraphQL queries, please read Part 1 of the series.
As you may notice, GraphQL queries are nested. Resolver functions are executed per nested level from top to bottom. The parent returns the result of the last executed function. If the query has only one level, it just returns null.
2. args
args refers to the parameters that were passed in to execute our query. For example, our postMessage mutation takes in user and text as arguments. We will pass these into our resolver function, which we will write in a bit.
3. context
It allows resolvers at each level to be able to share information where they can read and write from.
4. info
An abstract syntax tree (AST) object that contains all the information of the query. It will not be in the scope of this series. Read more about it in detail here.
Writing our First Resolver
Now let's start writing a resolver function for our Query messages. It's important to make sure that our resolver returns the same type as defined in our schema in Step 3.
So our Query type messages returns an array of Message objects. Therefore, its resolver function should be as follows:
//add inside the resolvers object
  Query: { //gets all messages
    messages: () => messages, //returns the messages array
  },
This resolver function is pretty straightforward. We don't need to pass in any arguments. We just need to return the messages array that contains all our Message objects. Let's try a harder one with our Mutation type.
The Mutation Resolver
Our Mutation is defined as:
//in our schema
  type Mutation {
    postMessage(user: String!, text: String!): ID!
  }
The mutation postMessage takes in 2 required strings (i.e. user and text) as arguments and returns an ID type. Thus, its resolver function will look like:
//add this below the Query resolver

 Mutation: { //post new message and returns id
    postMessage: (parent, { user, text }) => {
      const id = messages.length; //create the id for new message
      messages.push({id, user, text}); //push Message object to messages array
      return id; //return the id
    },
  }
So we pass in user and text as the args of the resolver function. Then, we create a new id for the new message, which will be the length of the messages array. We push a new Message object with all its relevant fields: id, user and text to the messages array. Finally, as defined in our schema, we only return the id.
So far so good? Let's write our final and most complex resolver function in this project.
Subscription: Final Resolver function
Our Subscription type called messages listens for changes in our messages array (i.e. when a new messages is pushed into it) and returns the updated messages array.
Resolvers for subscriptions are slightly different from queries and mutations in 3 ways:
- It returns an
AsyncIterator, which the server uses to push new event data to the client. - It is an object (i.e.
messages) with asubscribemethod. - It uses the
pubsubinstance as thecontext(3rd argument of the resolver function) to access the methods needed to handle the subscription (i.e. pubsub.publish() and pubsub.asyncIterator())
In short, Subscriptions resolvers are not a function, but an object with subscribe method, that returns AsyncIterable.
Putting it altogether, our Subscription resolver function will be:
  Subscription: {
    messages: {
      subscribe: (parent, args, { pubsub }) => {
        //create random number as the channel to publish messages to
        const channel = Math.random().toString(36).slice(2, 15);

        //push the user to the subscriber array with onMessagesUpdates function and
        //publish updated messages array to the channel as the callback
        onMessagesUpdates(() => pubsub.publish(channel, { messages }));

        //publish all messages immediately once a user subscribed
        setTimeout(() => pubsub.publish(channel, { messages }), 0);

        //returns the asyncIterator
        return pubsub.asyncIterator(channel);
      },
    },
  },
};
And now, we just need to add a line in our Mutation resolver function. This alerts our subscription to call the callback function every time a new message is pushed under Mutation.
Mutation: {
    postMessage: (parent, { user, text }) => {
      const id = messages.length;
      messages.push({ id, user, text });
      subscribers.forEach((fn) => fn()); //add this line
      return id;
    },
  },
Step 6: Create Server
At the bottom of this script, we initialize the server with our typeDefs (i.e. schema), resolver functions and pubsub as context.
const server = new GraphQLServer({ typeDefs, resolvers, context: { pubsub } });
server.start(({ port }) => {
  console.log(`Server on http://localhost:${port}/`);
});
Result
If all is working, we should be able to run our server with the command:
node index.js
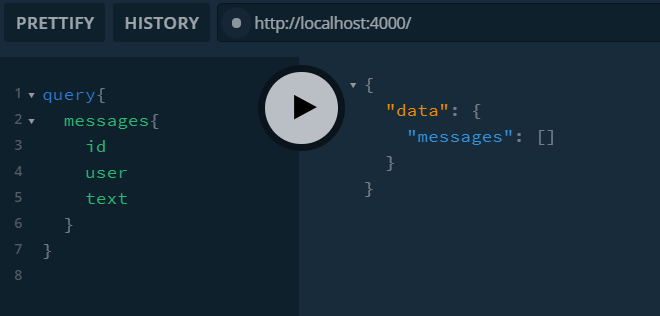
A GraphQL playground would then load at http://localhost:4000 by default. We can try a simple query as shown in the image below.
Test
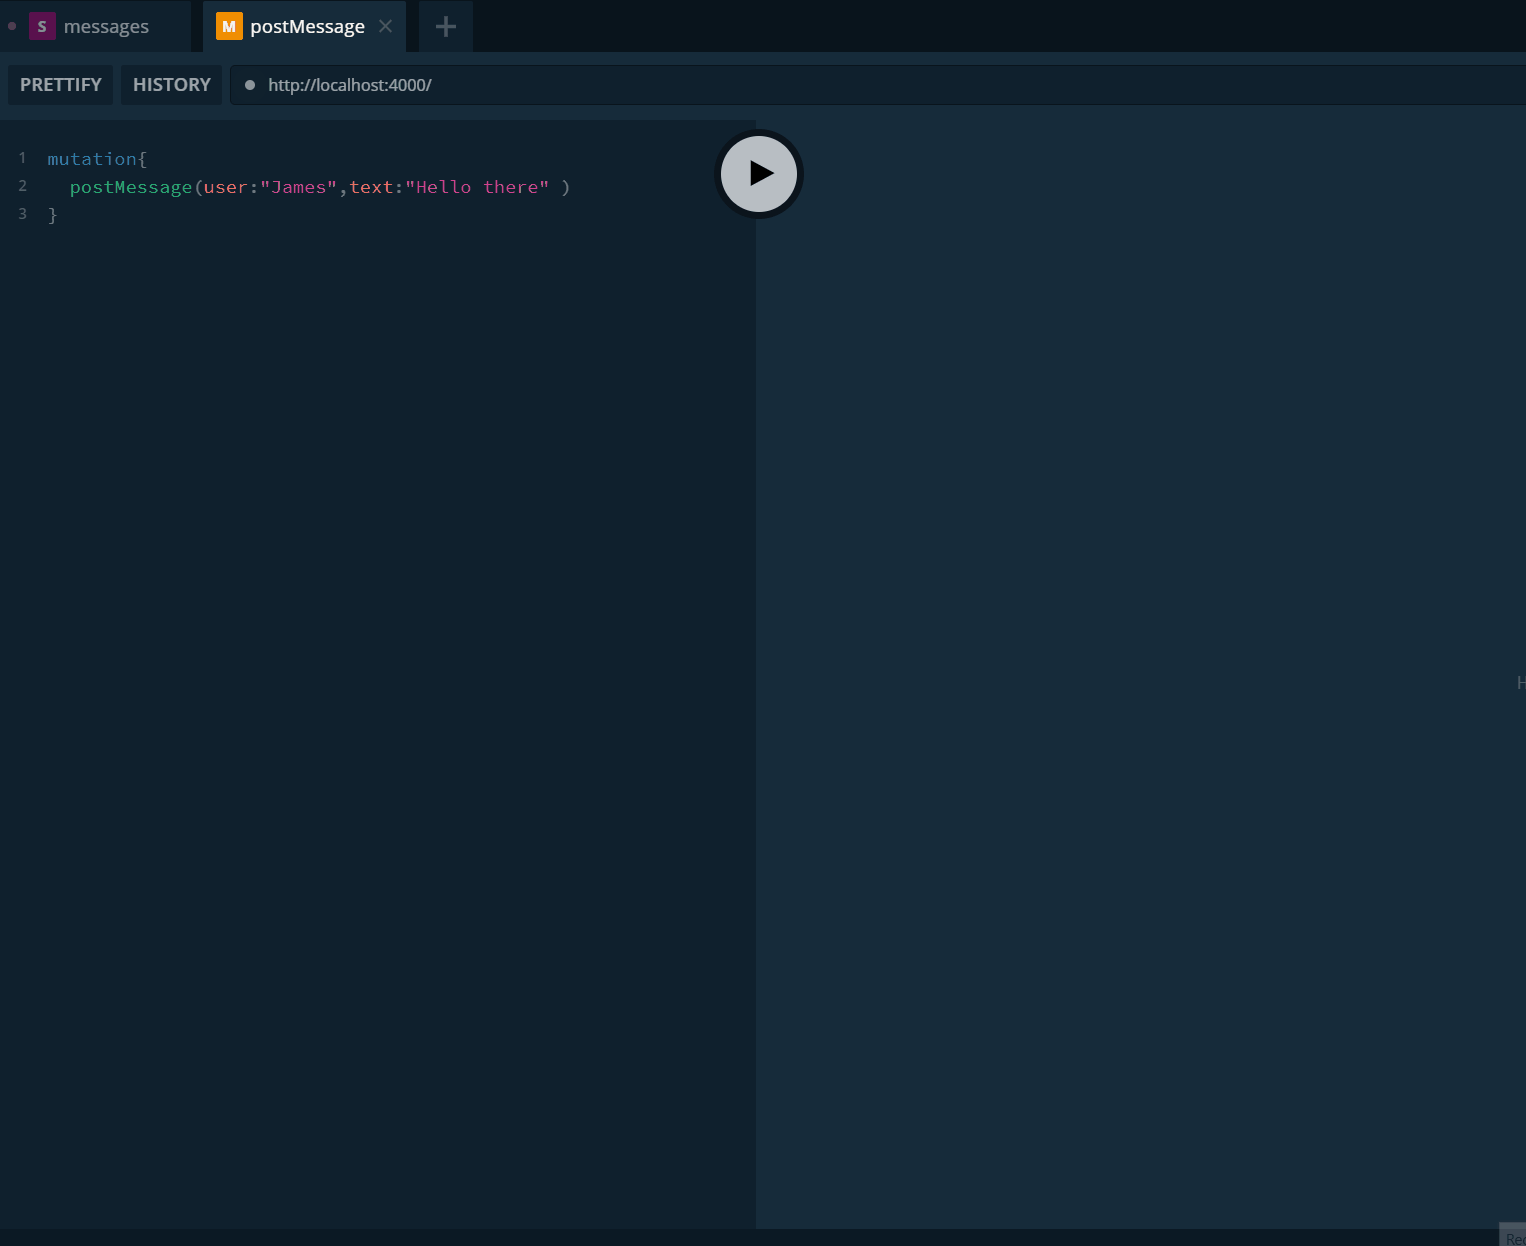
And we can make test queries to get, post and subscribe messages! Let's post a simple message while subscribing to messages.
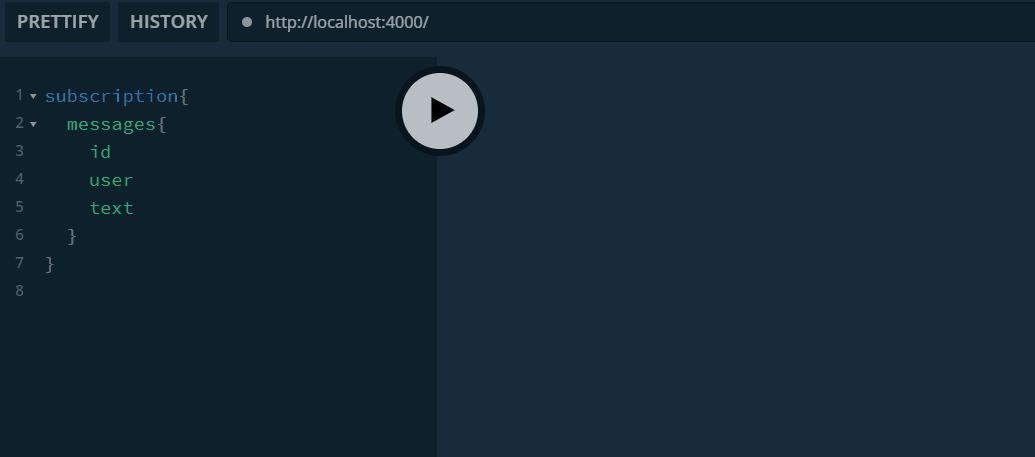
First, create a subscription query like the image below. When we run the query, it should return an empty array initially. Now, it is listening for new messages to arrive.
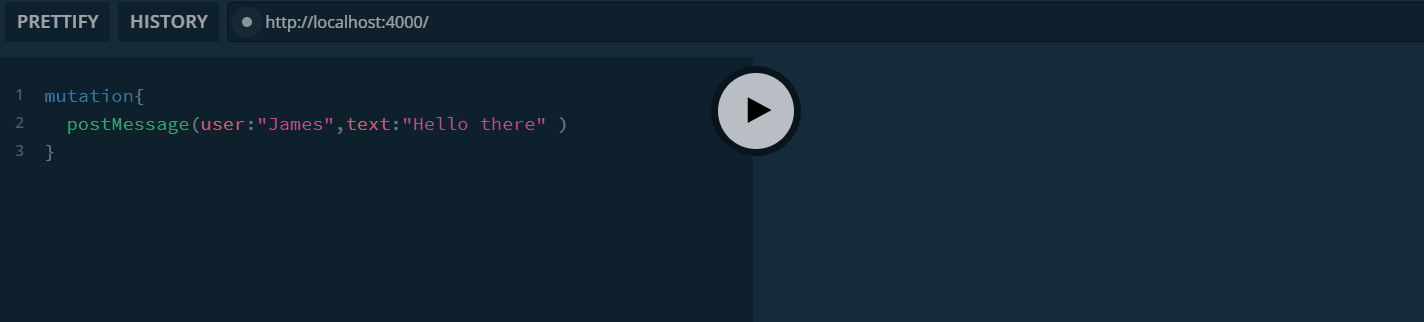
So let's post a new message with a mutation query. Open a new tab in the playground and run the mutation.
Great, a new message has been posted. If we go back to our subscription tab, we will see that it has successfully returned the new data.
As seen in the clip above, the subscription will return the new array of message every time a new message is sent. This will be how we can use subscription to implement our real-time chat app in the final part of the series. Isn't it cool?
Stay Tuned
Thanks so much for reading this long article. I hope it has been insightful so far. Please feel free to check out the Read More section below to learn more about the concepts used to build our server today.
All that's left is making the client to do these queries instead of doing it in the playground. That'll be coming up in the next part so stay tuned! Cheers!
%%[g4g]


