GraphQL for Beginners: Introduction
Let's build a real-time chat app with GraphQL, React and Apollo! Step-by-step tutorial for beginners 🔰 Part 1: Introduction to GraphQL
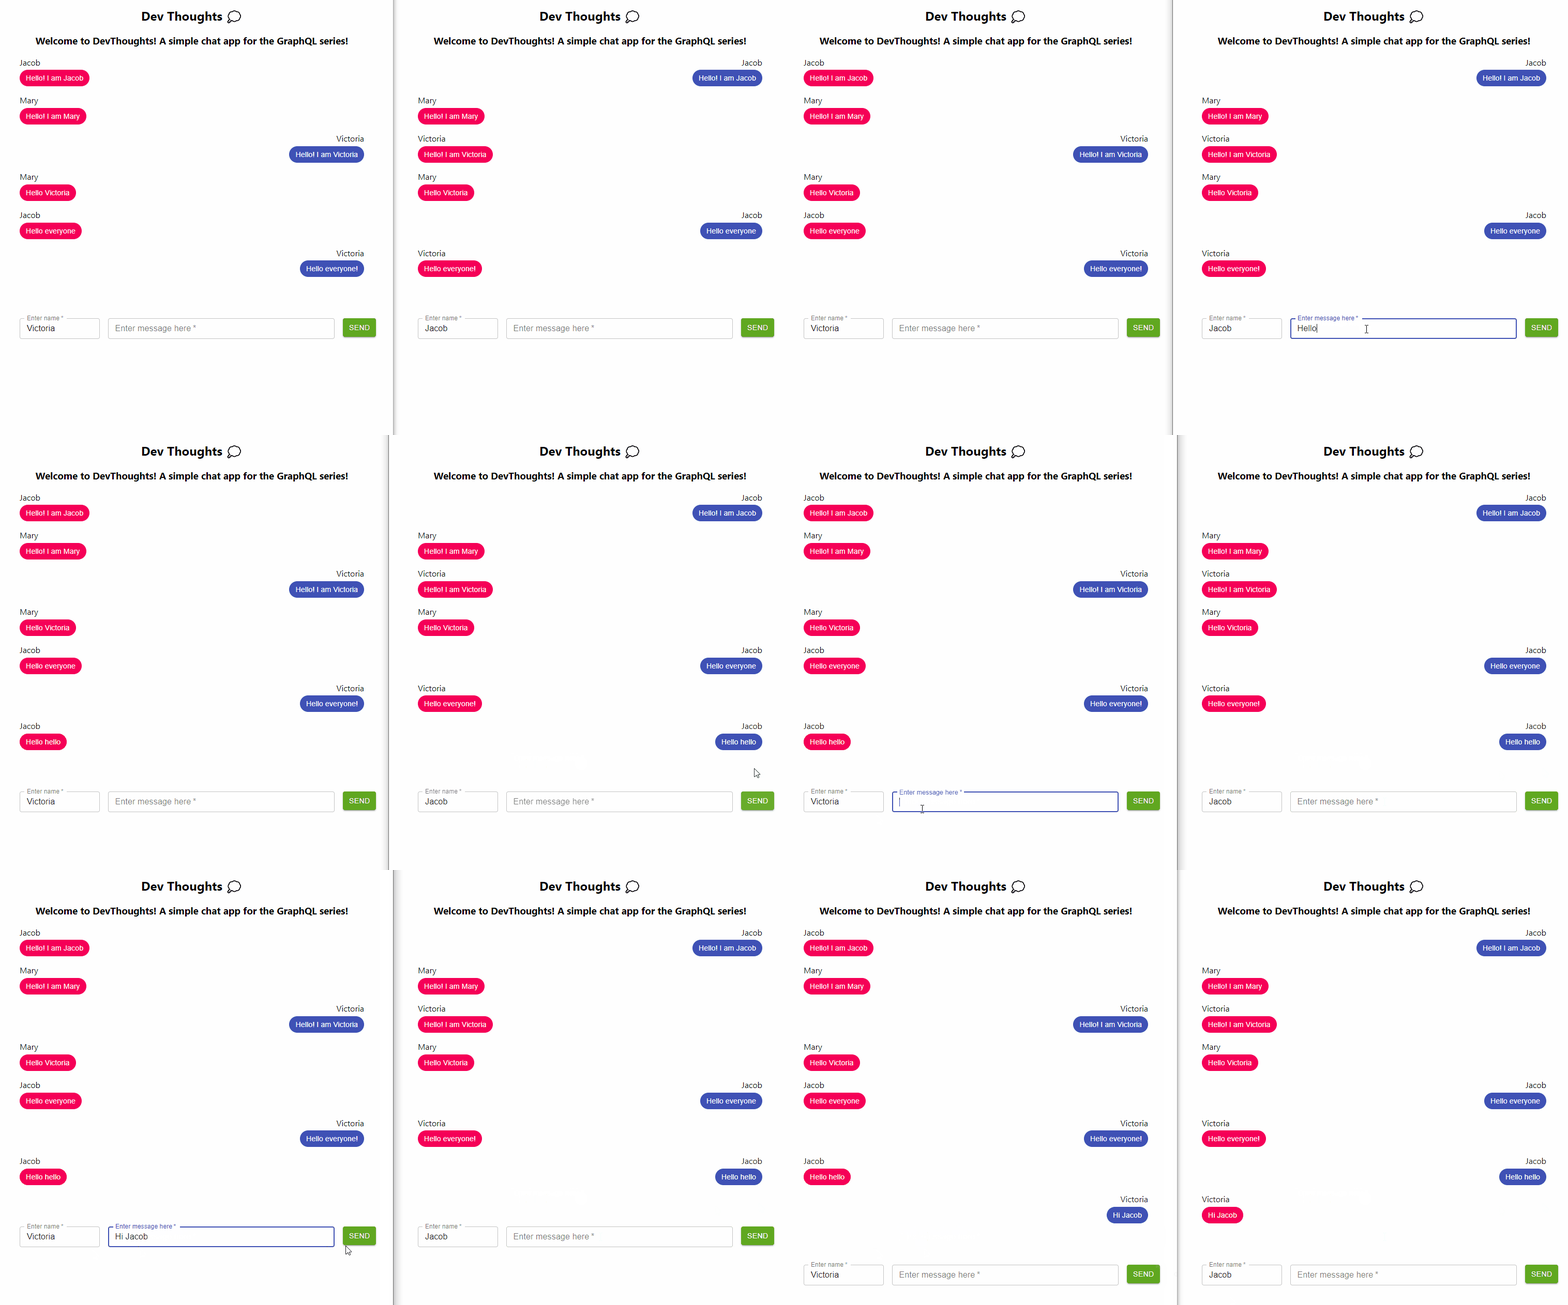
Welcome to GraphQL for Beginners! The primary goal of this series is to introduce the basic concepts of GraphQL and how to connect it to a front-end framework like React using Apollo. At the end of this series, you will have a simple chat app built with GraphQL, React and Apollo.
Sneak Peek:
Prerequisites
- No prior knowledge in GraphQL and Apollo needed
- Any code editor
- Intermediate-beginner experience with React, JavaScript
- For Windows: Git and Git Bash installed
- Optional: Get GraphQL in VS Code extension for syntax highlighting
 Click on image to download the extension.
Introduction to GraphQL
Before we even start building the app, we need to learn the technologies we will be using. In particular, GraphQL.
What is GraphQL?
GraphQL is a query language for APIs. It was developed by Facebook as a solution to fetch data more efficiently.
Why GraphQL: The Problems with REST
In REST APIs, each endpoint will return a specific payload of JSON data. Even if we only need certain fields, it will return everything on every request.
Take a look at the endpoint (https://pokeapi.co/api/v2/pokemon/ditto) in PokeAPI (A RESTful API for Pokemon):
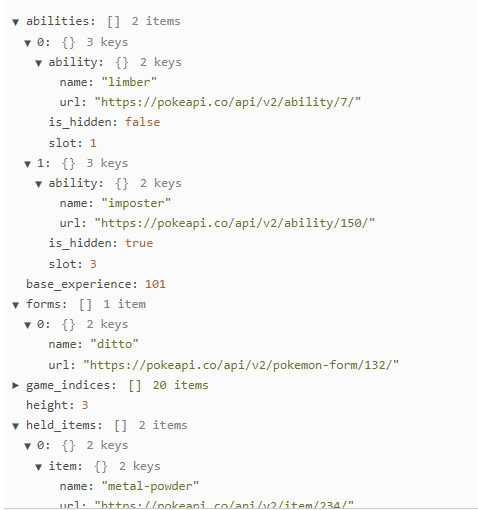
The returned chunk of data is very large, and most of the time, an app probably doesn't need all these data.
Also, the design of REST APIs may require an app to make a lot of unnecessary requests because some data may be from different endpoints. Going back to the PokeAPI, we can see that under abilities, there are URLs to get more specific data on each ability.
This means, in order to retrieve data about a single Pokemon's abilities, you need to make 3 HTTP requests:
https://pokeapi.co/api/v2/pokemon/dittoto get its abilitieshttps://pokeapi.co/api/v2/ability/7/to get info on ability 1https://pokeapi.co/api/v2/ability/150/to get info on ability 2
As demand for faster and more efficient apps increase among its users, Facebook recognized these issues in REST APIs. In 2012, it began developing GraphQL internally before releasing it to the public in 2015.
Let's take a look at how GraphQL solves the issues of REST APIs and more.
How GraphQL Works
As mentioned before it is a query language, which means it fetches only the data you need using queries. With GraphQL, there is:
- No overfetching or underfetching
- Less endpoints to manage (i.e. only
/graphql) - Flexible integration with database, a REST API, a cloud service, and a JSON file
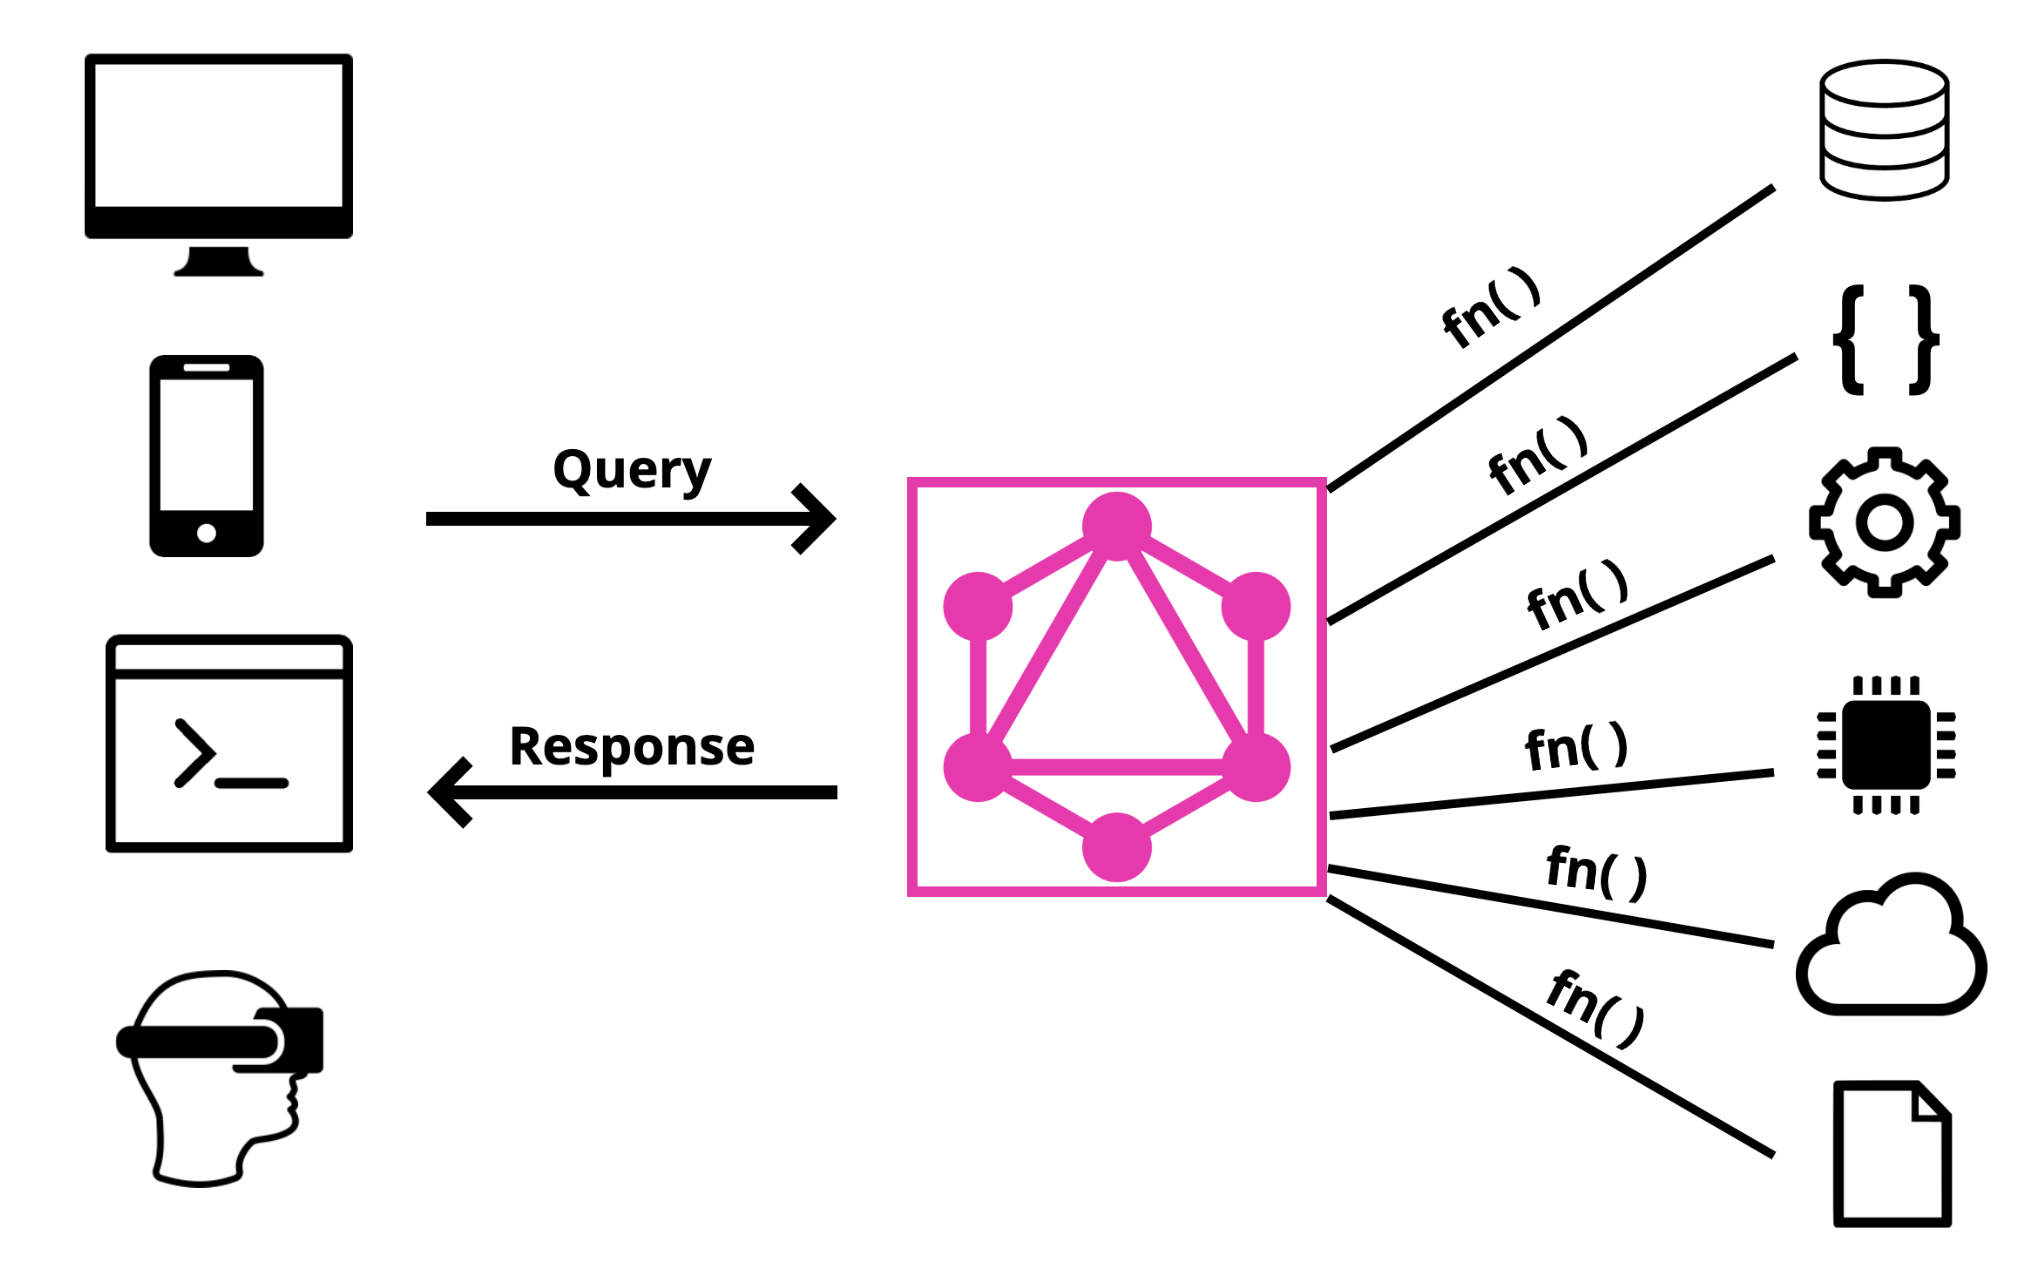
A typical GraphQL operation goes like this:
- Data is requested from the GraphQL server via a query.
- A function is called on the GraphQL server to get data from the appropriate source.
- The GraphQL server returns a response to the client.
GraphQL comes with an IDE called GraphiQL that is helpful for developers to test the API. The very first GraphQL API (SWAPI) uses GraphiQL.
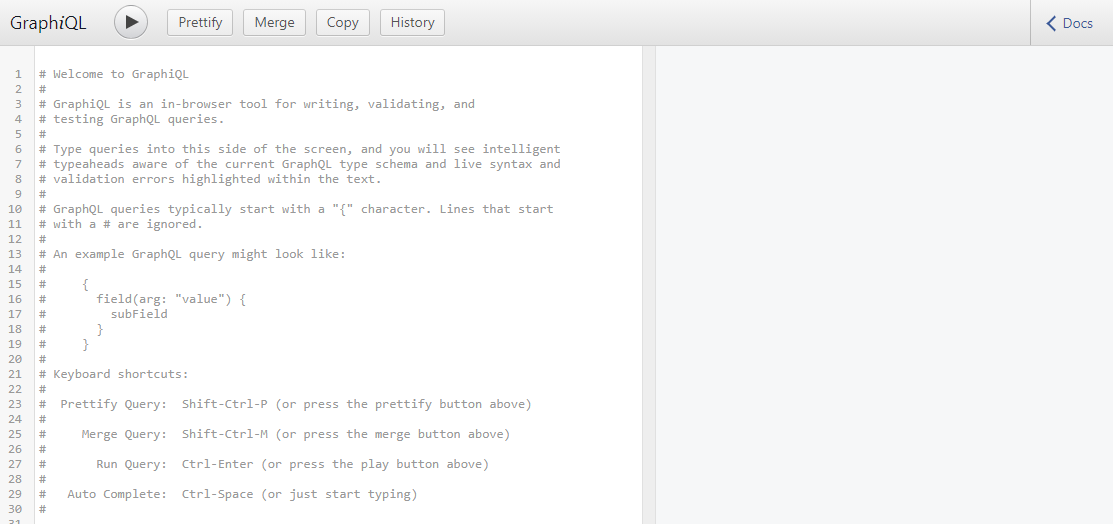
Alternative IDEs such as the GraphQL Playground is developed and maintained by Prisma. This is the one the Hashnode API is currently using.
Queries
Now that we know how GraphQL works, let's learn how to construct a query using Hashnode's API as an example.
The API Playground can be found at https://api.hashnode.com/.
Every GraphQL IDE has access to a Docs panel. This is the API documentation that is generated when a GraphQL API is built. It is a useful panel so that any developer, even those who never uses the API, can immediately understand what the API can do.
In the Hashnode API, we can click on the 'Docs' button on the right to open the panel.
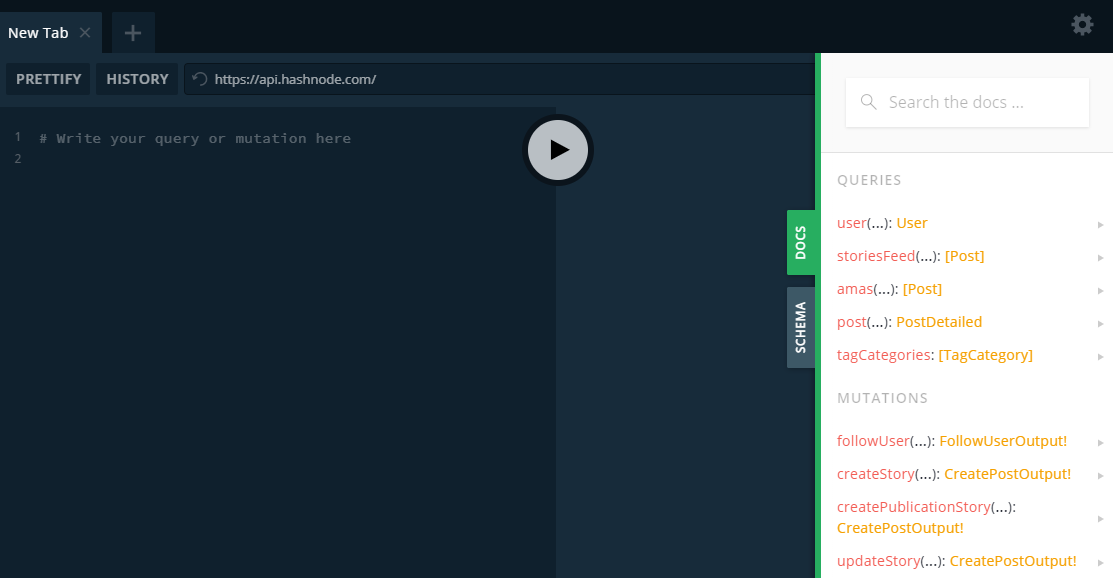
We can see a few lines under Queries such as user(...), storiesFeed(...), etc. These are the available query commands that this API can execute.
Let's try writing a query for user(...). Click on it to learn more about this query. You will see something like the image below.
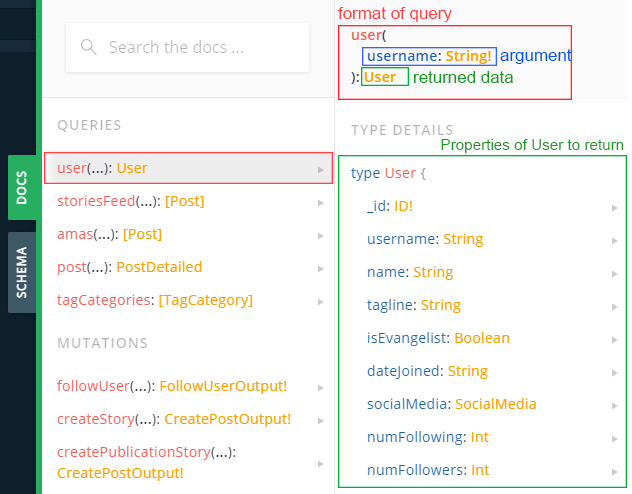
We can see that this query accepts a username as a required (non-nullable) argument. It is required because there is an exclamation mark next to it. If there's no exclamation mark, it is nullable (optional).
Next, this query will return a User type based on the supplied username. Below are the properties of User that you can choose to be returned. Unlike REST APIs, the returned User type doesn't need to include all its properties. You can just query the ones you want.
Let's say we want to fetch the name, dateJoined, numFollowers of my blog. My username is victoria. The query for this will be:
//any query must start with the query keyword
query{
  //write the query according to the format in the docs
  user(username:"victoria"){ //supply the username arg as a String
    //include the properties you want to get
    name
    dateJoined
    numFollowers
  }
}
Now let's execute this query in the Playground:
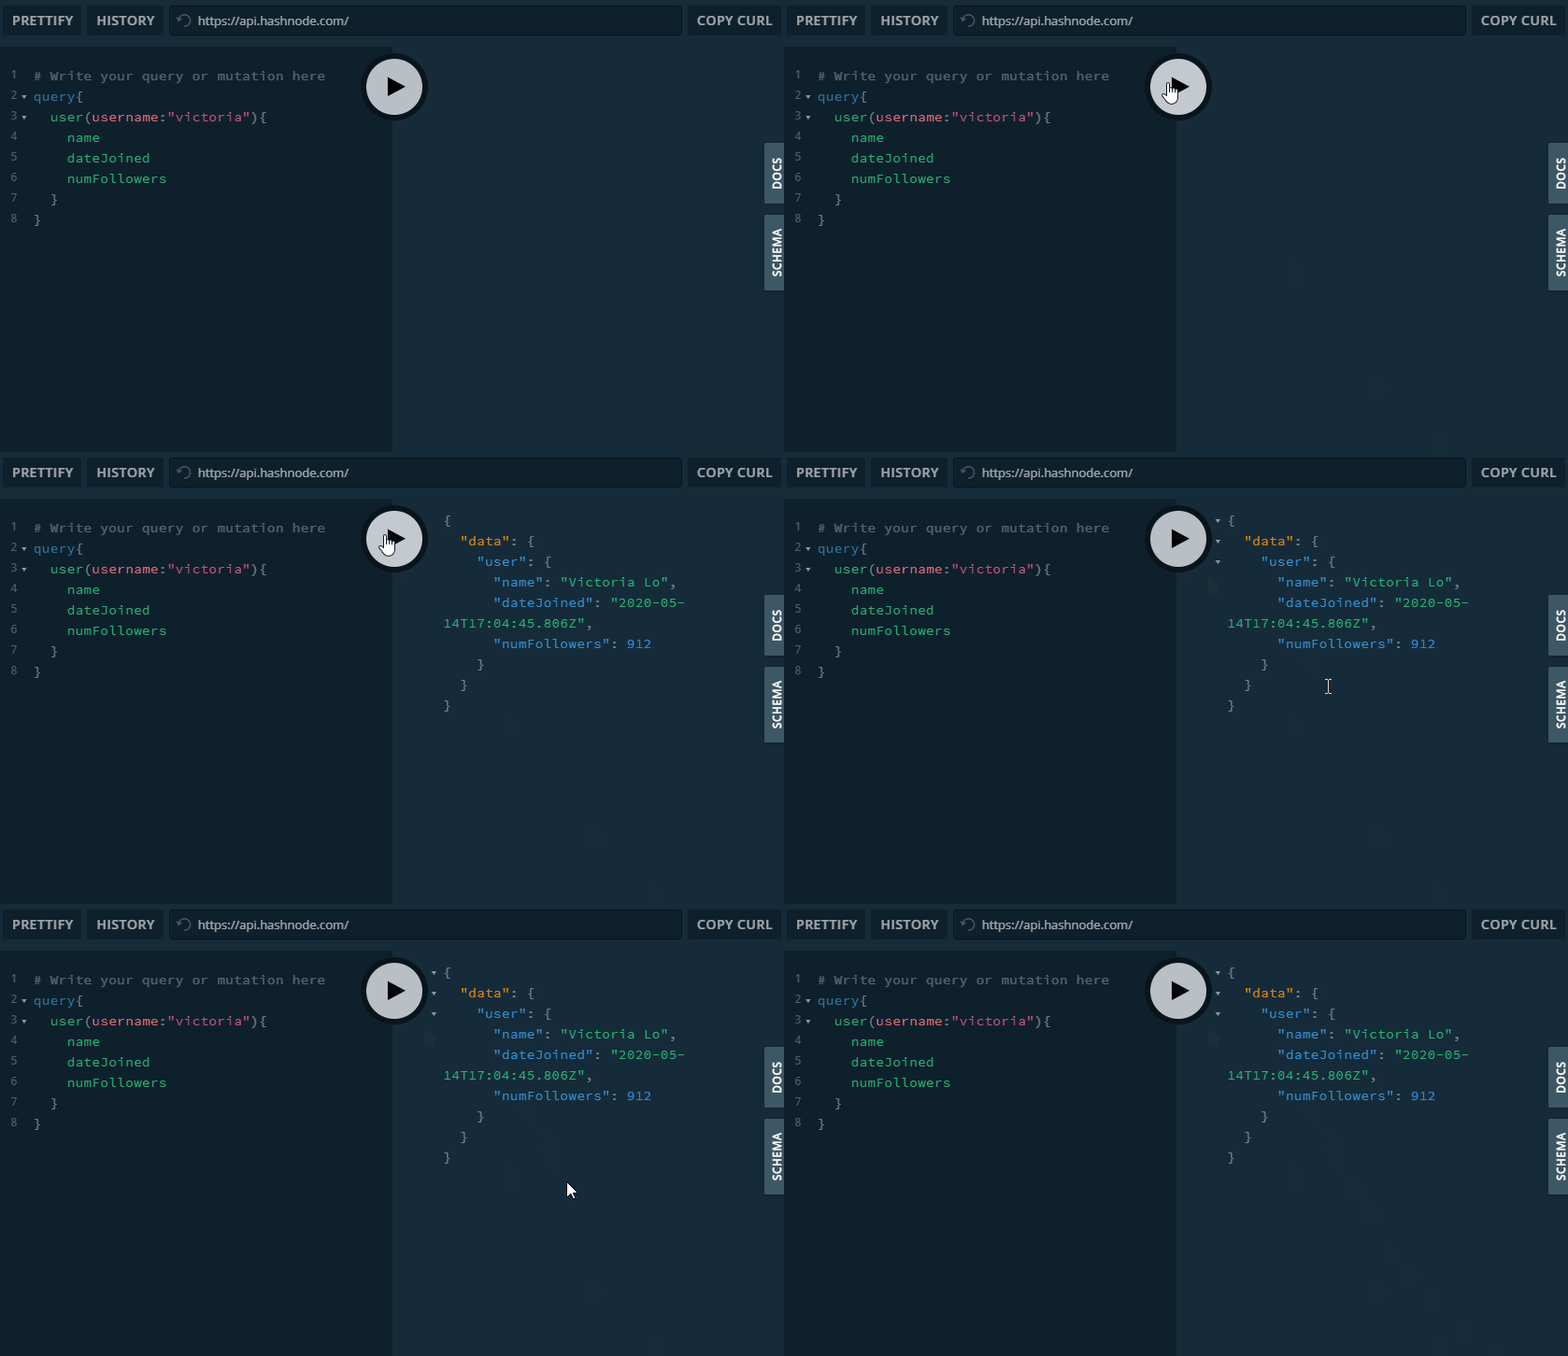
And ta-da! The API returns a JSON with the exact data we wanted. No more, no less. This is the beauty of GraphQL indeed.
Scalar vs. Object Types
In the example above, our returned data is a User type. User is an object type because it has properties that you can further query.
The properties we queried earlier (name, dateJoined and numFollowers) have a type too, such as String and Int. These are scalar types. Scalar types consists of 6 categories:
- ID
- Float
- Int
- String
- Boolean
An object type like User can have scalar type properties or object type properties or both. Back in the docs, we can see that User has 2 object type properties: SocialMedia and Publication. If we click on SocialMedia, we can see the object's properties that we can query further.
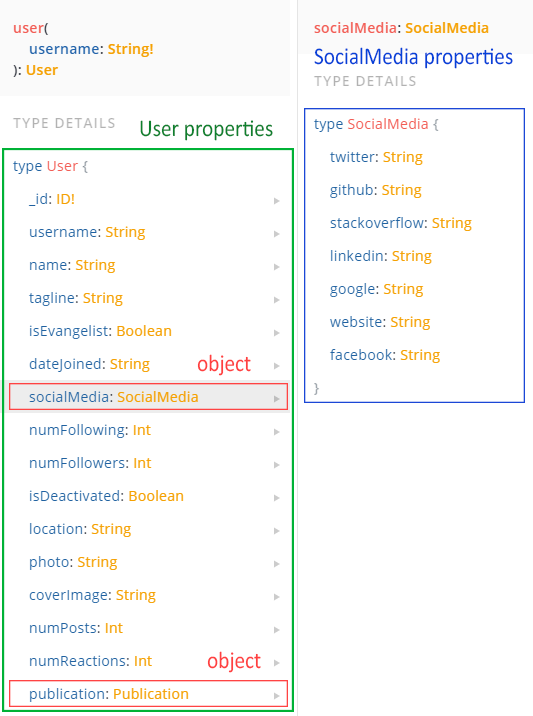
Let's try querying a User's SocialMedia's twitter, github and website properties.
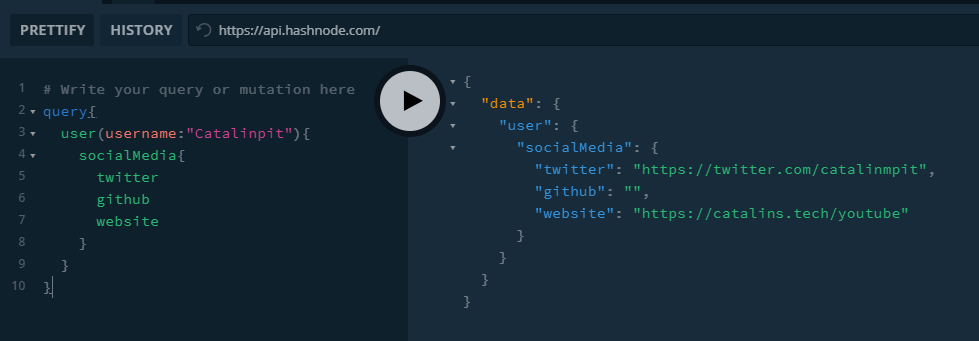
The query works perfectly. This time, we have a deeper nested query as we first have to query User, then socialMedia and finally, the properties we want.
And that's the gist of queries. Of course, there are more details on queries that is out of this series' scope, so please feel free to browse the 'Read More' section at the end of this article. I have included some really amazingly written resources if you'd like to learn more on your own.
Mutations
The next important concept about GraphQL is mutation. If a Query is equivalent to a GET request in REST, then a Mutation is like a POST request.
Essentially, they are written like queries do. The only difference is that it is used to make changes to the back-end data.
To illustrate mutations, let's use another GraphQL API called Snowtooth (Ski Resort) API.
In the Docs, we can see the available mutations for this API under Mutations. Let's click on setLiftStatus(...) to see what it can do.
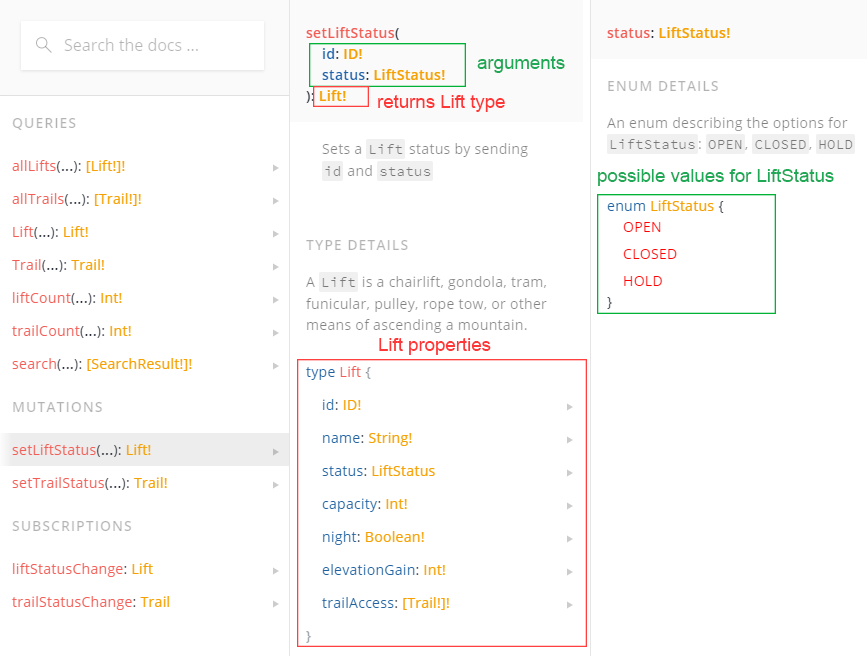
As shown in the image above, this mutation allows us to change the LiftStatus property of a Lift object type by supplying the its id and LiftStatus properties as arguments.
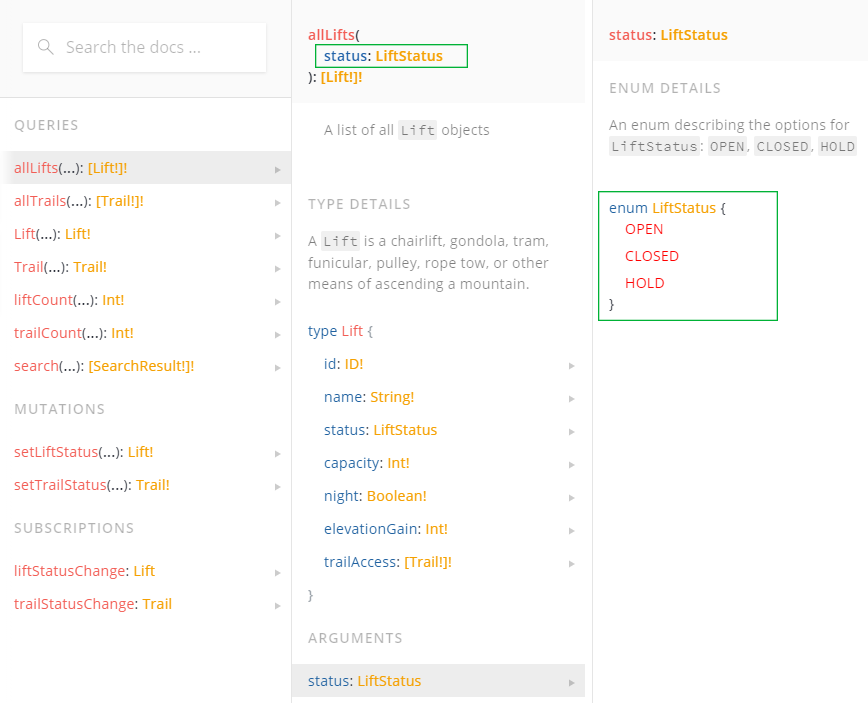
Notice that LiftStatus is not a scalar type. If we click on it, we can see that it is an enum that only be one of the values: OPEN, CLOSED or HOLD. This is important to note so that we don't supply a random String as its value or it will return an error.
So to perform this mutation, let's query allLifts to get the id of a random Lift. As seen below, allLifts takes an optional LiftStatus argument (because no exclamation mark).
We make a simple query to get allLifts with a LiftStatus of OPEN and get their id property.
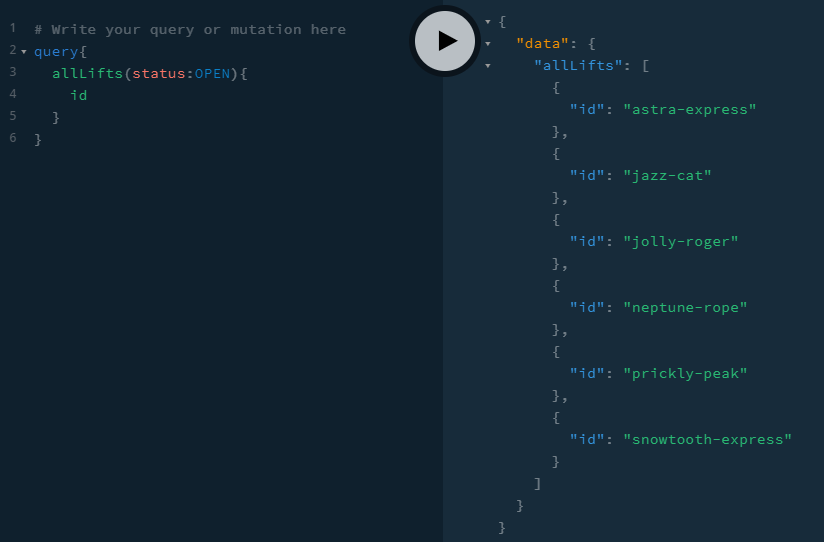
Then, let's take a random id from the returned list for our mutation. I choose astra-express for this example.
Now, we have all the arguments we need to write the mutation to change the status of astra-express from OPEN to CLOSED like so:
//every mutation must start with the mutaion keyword
mutation{
  //supply the appropriate arguments
  setLiftStatus(id:"astra-express", status:CLOSED){
    //return the following properties after the mutation
    id
    name
    status
  }
}
And the result of the mutation will show that the astra-express Lift now has a status of CLOSED.

And that's how we can perform a mutation. Pretty straightforward like queries, isn't it?
To Be Continued
Thanks for reading this article. I hope it has been helpful so far. It is getting quite long so let us continue in the next part, where we will learn GraphQL Schemas, Subscriptions and Servers.
In the meantime, please have a look at the Read More section below if you want to explore the concepts in this article a little more deeply. Cheers!
Read More
- Part 2: GraphQL Schemas, Subscriptions and Servers
- Anatomy of GraphQL query
- GraphQL Pros and Cons
- GraphQL queries explained in simple terms


