Introduction to Redux Toolkit for Beginners
Learn how to simplify state management in React with Redux Toolkit

In this article, let's learn about Redux Toolkit, or as the development team calls it, "the official, opinionated, batteries-included toolset for efficient Redux development".
What is Redux & How it Works
Most web developers would probably have heard of Redux, a popular state management library. It first came to the front-end world in 2015 as the revolutionary state management solution built by Dan Abramov and Andrew Clark.
In front-end frameworks like React, Angular or Vue, each component internally manages their own states. As the app gets more complex, managing states across many components becomes tedious and difficult. Redux became the solution to this issue.
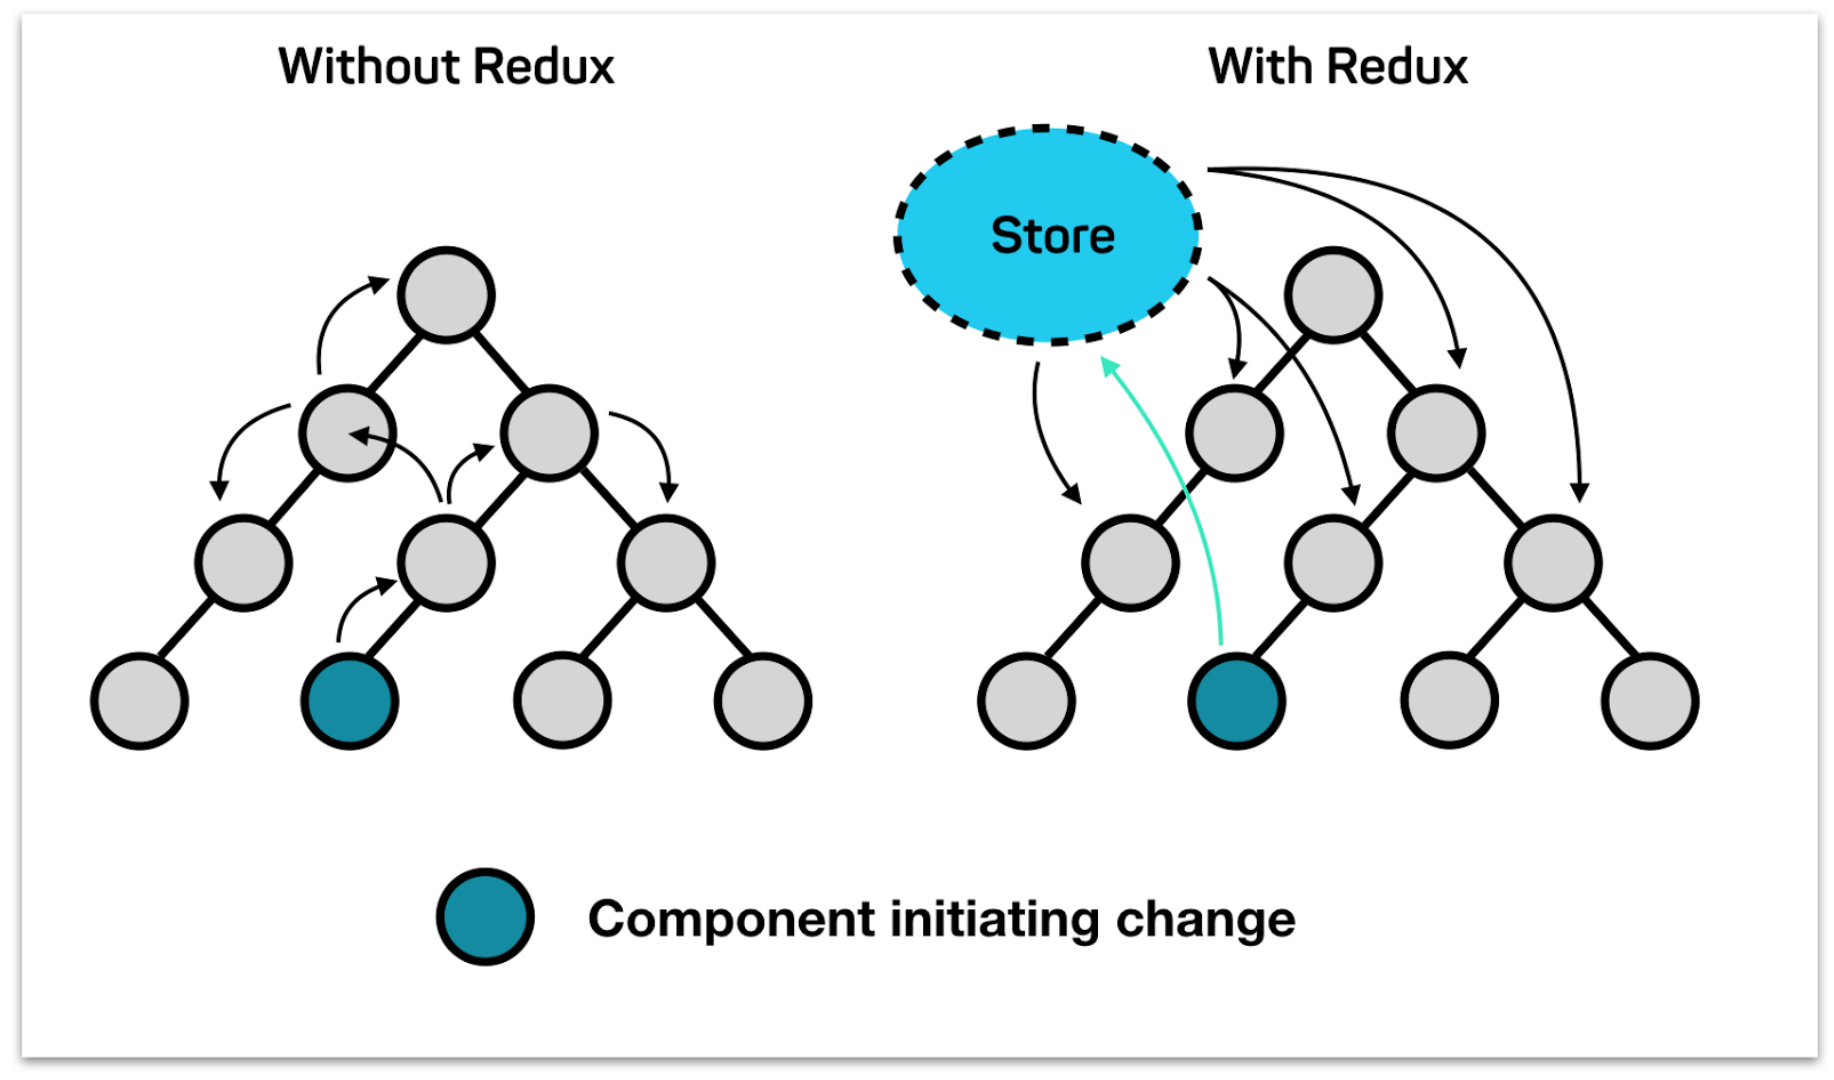
Redux works by providing a centralized 'store', which holds all the states within the app. Each component in the app can access this store without having to pass props around in the component tree.

Image from codecentric
The Redux Flow
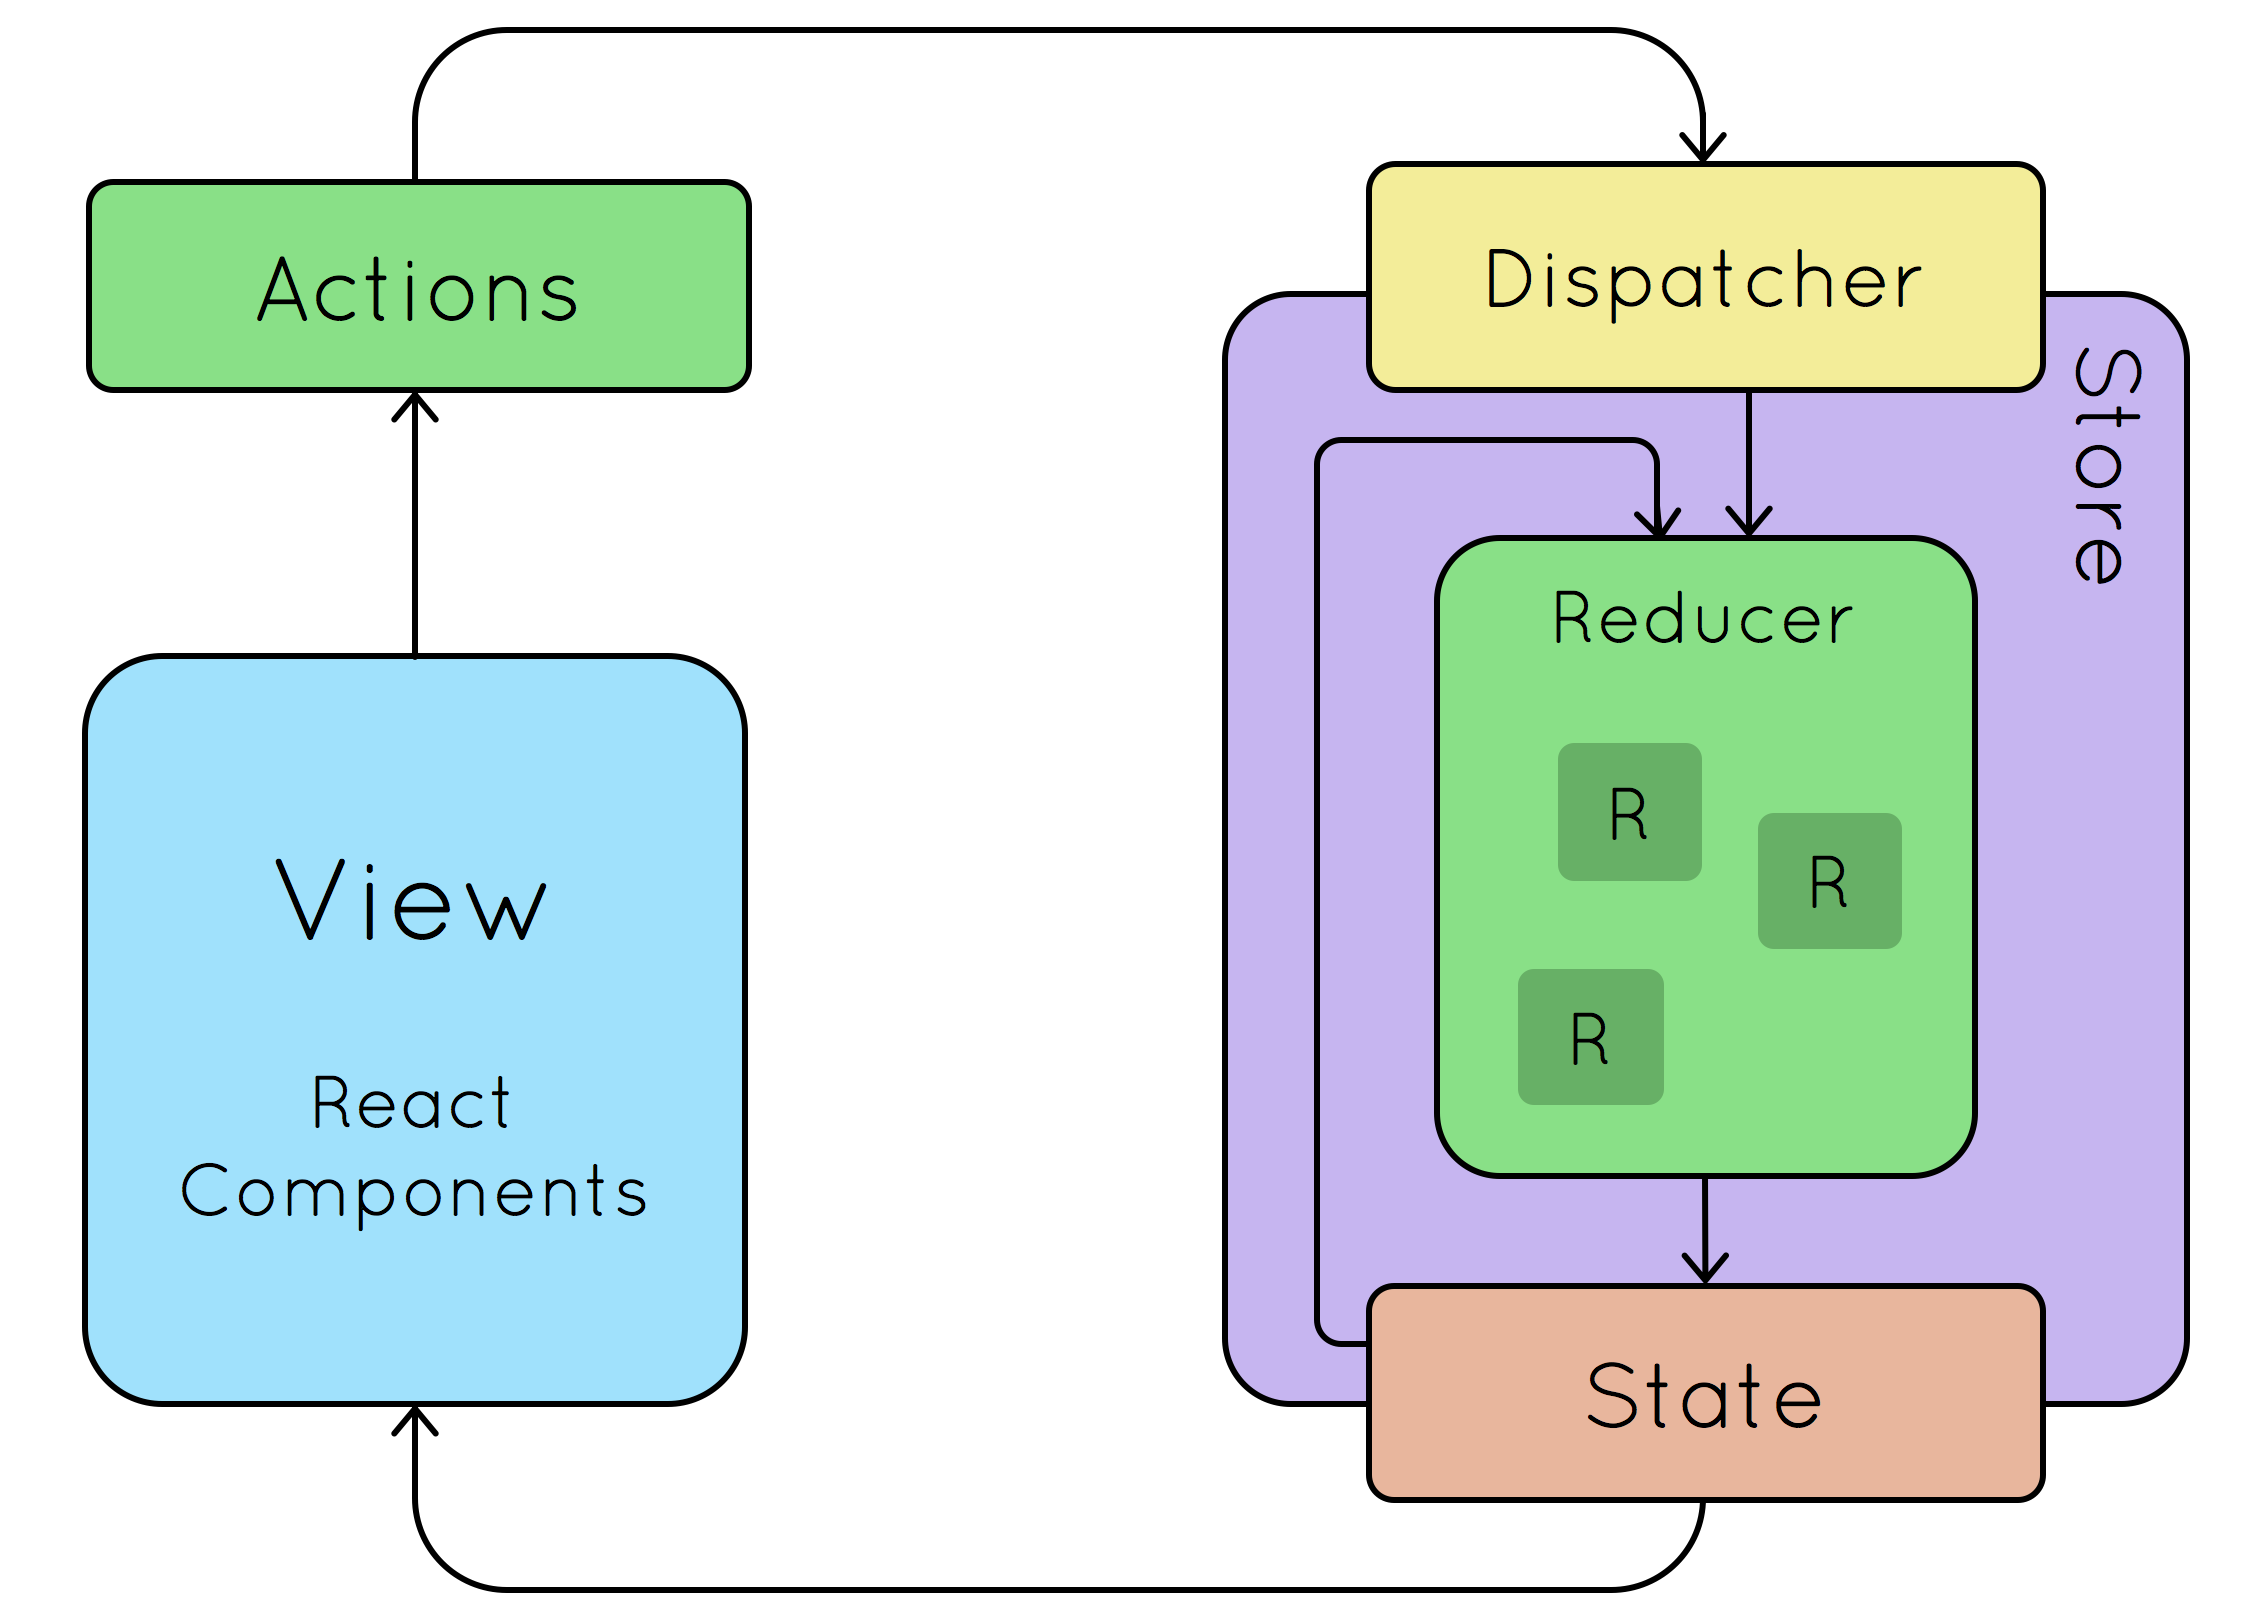
The typical Redux flow is as follows:
A user interacts with the View to trigger a state update
When a state update is required, the View dispatches an action
The reducers receive the action from the dispatch and updates the state in the Store according to what is described by the action
The View is subscribed to the Store to listen for state changes. The changes are notified via the subscription methods and the View updates its UI accordingly

Image from esri
The Redux flow is made up of 3 main components: Actions, Reducers, Store. Understanding the relationship between these components is necessary to how Redux works.
Actions are JavaScript objects with a required type property and can include custom properties where needed. They are only used to describe what happened to the state, they are not responsible for changing them. Some examples of actions:
//action to add a todo item
{ type: 'ADD_TODO', text: 'This is a new todo' }
//action that pass a login payload
{ type: 'LOGIN', payload: { username: 'foo', password: 'bar' }}
The type of an action is simply a string that describes the action, and the added properties are information that are needed to update the state. An action is dispatched via the store.dispatch(action) method, and reducers handle updating the state.
Reducers are pure functions that takes in the current value of a state, performs the operations on it as instructed by the action, then outputs the new value of the state. They are the ones responsible for changing the value of the state. Here's a simple example of a reducer function:
//takes in the current state and action
//updates the value based on the action's type
function counterReducer(state = { value: 0 }, action) {
  switch (action.type) {
    case 'INCREASE':
      return { value: state.value + 1 }
    case 'DECREASE':
      return { value: state.value - 1 }
    default:
      return state
  }
}
Finally, the state will be updated in the Store. The Store is where all the states are managed. It can be created in a single line:
const store = createStore(myComponent);
The components must be subscribed to the Store to listen for state updates to render the states correctly in the UI. The store.subscribe() method adds a change listener that will be called whenever an action is dispatched.
Why Redux Toolkit
At this point, we can see why Redux was a popular option for state management. Its pattern makes states predictable, as reducers are pure functions, which means the same state and actions passed will always result in the same output.
It is also easily maintainable and scalable due to the strict organization on how each part in the Redux flow should behave and work. Also, there are many other benefits such as efficient testing, easy debugging and better performance that Redux brings to the table.
However, this flexible and high-level state management library comes with a few challenges:
Too much code to configure Store to optimized levels/best practices
Too much boilerplate code makes code less clean and efficient
Too many packages needed to install to build scalable apps
Writing actions and reducers becomes more complex and cumbersome in huge applications
To address these challenge, the Redux team came up with Redux Toolkit, the official recommended approach for writing Redux logic. It aims to speed up Redux development by including Redux Core with the packages that they think are essential to build a Redux app. It is an opinionated derivative of Redux, with many best practice configurations for Redux beginners or developers who want simple, fast and clean Redux code.
So let's get started with Redux Toolkit and set it up with a new React app.
Getting Started with Redux Toolkit
Step 1: Install Packages
To get started with Redux Toolkit and React-Redux packages, you can run the following command on an existing React app:
npm install @reduxjs/toolkit react-redux
Alternatively, install via Create React App with:
npx create-react-app my-app --template redux
Step 2: Create & Initialize Store
Now let's create a store to hold our states. We can create a store.js file in our src folder and add the following code in it:
import { configureStore } from '@reduxjs/toolkit'

export default configureStore({
  reducer: {} //add reducers here
})
The configureStore here replaces the original createStore from Redux. Unlike createStore, configureStore from Redux Toolkit not only creates a store, but it can also accept reducer functions as arguments and automatically sets up the Redux DevTools Extension for easy debugging.
Step 3: Provide Store in React app
Once our store is created, which we will need every component in our React app to be able to access. We can do this using the Provider from our react-redux package we installed.
In our index.js file, we import the Provider and our store.js like so:
import store from './store'
import { Provider } from 'react-redux'

ReactDOM.render(
  <Provider store={store}>
    <App />
  </Provider>,
  document.getElementById('root')
)
Step 4: Write Reducers and Actions
We can now write some reducer functions and actions for our Redux store.
In the traditional Redux, we usually write reducers and actions separately. For example, a simple reducer and action for a counter app will be written in traditional Redux like so:
Actions
// actions/index.js
export const Increase = () => ({
  type: 'INCREASE'
})

export const Decrease = () => ({
  type: 'DECREASE'
})
Reducers
// reducers/index.js
export default (state = 0, action) => {
  switch (action.type) {
    case 'INCREASE':
      return state + 1
    case 'DECREASE':
      return state - 1
    default:
      return state
  }
}
With Redux Toolkit, we can make the code much more concise by using createSlice. Create a counterSlice.js file in the src folder of the app. Both the reducers and actions can be written under a slice like so:
import { createSlice } from '@reduxjs/toolkit'

export const counterSlice = createSlice({
  name: 'counter',
  initialState: {
    value: 0
  },
  reducers: {
    increase: state => {
      state.value += 1
    },
    decrease: state => {
      state.value -= 1
    }
  }
})

// each case under reducers becomes an action
export const { increase, decrease } = counterSlice.actions

export default counterSlice.reducer
As seen from the code above, defining reducers and actions become cleaner and faster in Redux Toolkit. There is no longer need to use the switch statements to manage the action with its corresponding reducer.
Another thing you may have noticed is that it seems we are now directly mutating the state's value in the reducer function instead of returning a new value to update the state. This is actually because Redux Toolkit uses the Immer library, which allows writing "mutating" logic in reducers.
For more information on how Immer works, feel free to visit its documentaion here.
Step 5: Import Reducer
We have exported our reducers and actions from our counterSlice.js. So let's import the reducer into our store.js.
import { configureStore } from '@reduxjs/toolkit'
import counterReducer from '.counterSlice' //import our reducer from step 4

export default configureStore({
  reducer: {
    counter: counterReducer //add our reducer from step 4
  }
})
Step 6: Add Dispatch Functions in UI
As we have learned earlier, our View triggers an action to be dispatched in order to update a state. In Redux, we use store.dispatch(action) to dispatch an action.
Instead, let's use React-Redux to use the useDispatch hook to dispatch actions and useSelector to read data from the store.
Create a Counter.js file in our src folder to represent our Counter component. In this file, we will import our useDispatch and useSelector hooks from React-Redux. We will also import our actions from our counterSlice.js.
import { useSelector, useDispatch } from 'react-redux'
import { decrease, increase } from './counterSlice'
Then, our Counter function will initialize our 2 hooks and return UI elements with our dispatch(action) triggered when clicked.
export function Counter() {
  const count = useSelector(state => state.counter.value)
  // in our slice, we provided the name property as 'counter'
  // and the initialState with a 'value' property
  // thus to read our data, we need useSelector to return the state.counter.value

  const dispatch = useDispatch()
  // gets the dispatch function to dispatch our actions

  return (
    <div>
        <button onClick={() => dispatch(increase())}>
          Increase
        </button>
        <p>{count}<p>
        <button onClick={() => dispatch(decrease())}>
          Decrease
        </button>
    </div>
  )
}
Conclusion
Redux Toolkit is a great option for both beginners and developers who wants to reduce the amount of boilerplate code in Redux. It allows us to write cleaner and more readable code while keeping the Redux flow and pattern.
Thank you for reading. I hope this article has been helpful in getting you started with understanding Redux and using Redux Toolkit in your applications. Cheers!


