
GitHub Actions 101: Develop a CI/CD Workflow
Hello and welcome to Part 4 of the GitHub Actions series. A series where we will walk through everything you need to know about GitHub Actions, from the basics to creating your own customized workflow.
In this previous part, we learned about secrets, how to use actions from different sources and pass arguments using with. We also created a simple automate pull request review workflow after putting together all that we have learned.
If you have missed it, please read Part 3 here.
This part of the series will be an exciting one. We will develop a CI/CD workflow to automate linting, testing and deploying an app using GitHub Actions. Without further ado, let's begin!
Step 1: Plan a CI/CD Workflow
Before we start building the workflow, we need to plan what to include in our CI/CD workflow.
Wait, what's CI/CD?
For those who are unsure of what I mean by CI/CD, let me give a quick overview on these 2 fundamental concepts in DevOps.
If you'd like to understand DevOps in more details, feel free to check out my beginner-friendly DevOps Series on this blog or Udemy for free.
The CI in 'CI/CD' refers to Continuous Integration. It primarily involves automated linting, testing as well as merging branches frequently into the master branch to ensure it remains stable and error-free.
The CD refers to Continuous Deployment. It is the fully automated process of building, testing and deploying an application.

In the context of our CI/CD workflow, we will use GitHub actions to automate the following steps:
- Build Project
- Run Tests
- Deploy Project
In order to illustrate how to build this workflow, we need an app.
Step 2: Our App
For this example, I am using this a simple color organizer app that allows the user to add/delete a color and update its rating. You can use any app to create an automated CI/CD workflow.

In this app, I have created some unit tests that can be run with the npm test command. Also, I have initialized and committed this app in this repo to be ready for deployment to GitHub Pages.
Now let's start building our CI/CD workflow.
Step 3: CI/CD Workflow
As we've learned in Part 1 of this series, we create a workflow by click on the Actions tab.

Our workflow will do the following:
- Triggers on
pushto themainbranch or by manual - Executes 2 jobs:
buildanddeploy.deployis dependent onbuild. - Under
build, it will run thesesteps:- Clone repo & checkout code (actions/checkout@v2)
- Install Node.js (actions/setup-node@v2.4.0)
- Install NPM packages (
npm ci) - Build project (
npm run build) - Run tests (
npm run test) - Upload build files as artifact (actions/upload-artifact@v2)
- Under
deploy, it will run thesesteps:- Download build artifact (actions/download-artifact@v2)
- Deploy to GitHub pages (crazy-max/ghaction-github-pages@v2)
At this point, if you have been following the series from part 1, you are probably familiar with how to write a workflow as described above. But there may be one word that may be new to you: artifact.
Artifact
In short, it can be a file or a directory that is produced during a workflow run such as test logs, build files, etc. In order to access these data across jobs, you can upload an artifact to GitHub in a job and then download it when needed in another job.
In our CI/CD workflow, we will build our app and upload the production-ready files as an artifact in our build job. Then, in our deploy job, we download this artifact aka our build folder to deploy to GitHub pages.
If you want to, this is where you can stop and try to write the workflow .yml file according to the workflow pseudocode above.
Coding in Progress...

Solution
Ready to check your answer? Here's the final CI/CD workflow file:
name: CI/CD Example # workflow name

on: # attribute determines how workflow gets triggered
  push: # triggers on a`push` to the `main` branch
    branches: [ main ]
  workflow_dispatch: # triggers manually

jobs:
  build: # job 1 identifier
    name: Build
    runs-on: ubuntu-latest

    steps:
    - name: Clone repo & checkout code
      uses: actions/checkout@v2
      # this action allows the runner to access your code by cloning it

    - name: Install Node.js
      uses: actions/setup-node@v2.4.0
      # installs and sets up Node environment in our runner
      with:
        node-version: 14.x

    - name: Install NPM packages
      run: npm ci
      # similar to npm install, for automated environments

    - name: Build project
      run: npm run build # command to build project

    - name: Run tests
      run: npm run test # command to run tests

    - name: Upload production-ready build files
      uses: actions/upload-artifact@v2
      # uploads build files to be accessible across jobs
      with:
        name: production
        path: ./build

  deploy: # job 2 identifier
    name: Deploy
    needs: build
    # the build job must succeed in order to run this job
    runs-on: ubuntu-latest

    steps:
    - name: Download artifact
      uses: actions/download-artifact@v2
      # downloads the uploaded build files
      with:
        name: production
        path: ./build

    - name: Deploy to Github pages
      uses: crazy-max/ghaction-github-pages@v2
      # action to deploy to GitHub Pages
      with:
        target_branch: gh-pages
        build_dir: ./build
      env:
        GITHUB_TOKEN: ${{ secrets.GITHUB_TOKEN }} # default secret for auth
Step 4: Run Workflow
Let's try to run the workflow to check if everything is working.
Here is a screenshot of thebuild job being completed. All tests passed, the app was successfully built, and the build folder artifact was uploaded at the end of this job.
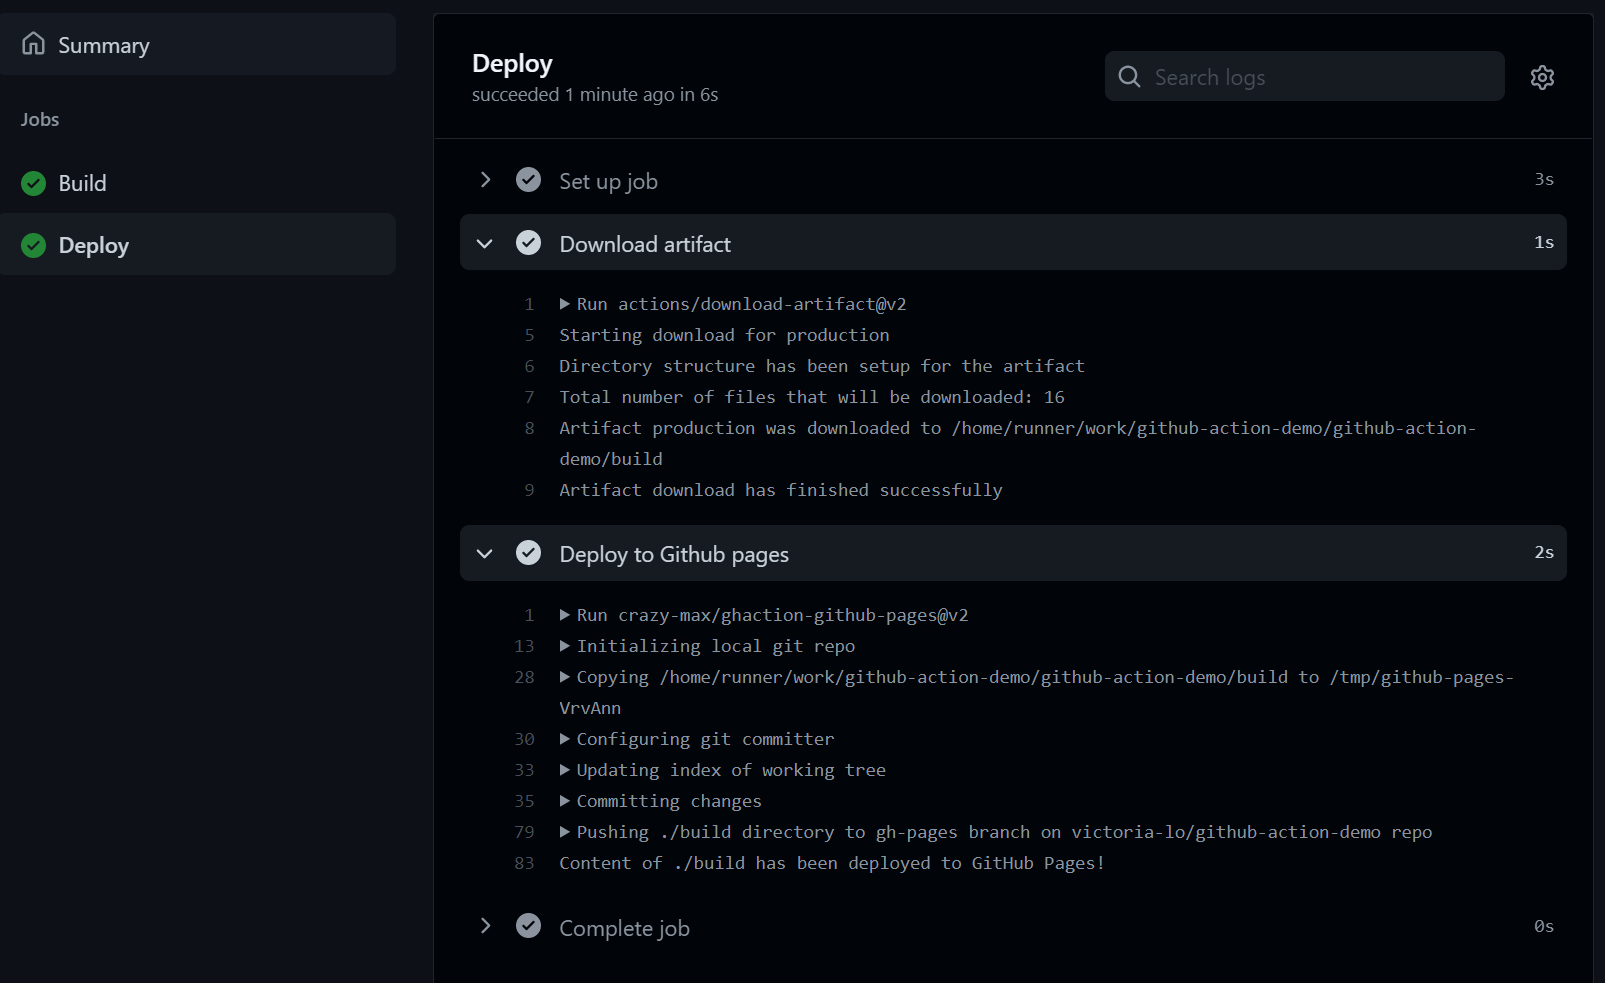
Our next job is deploy. As shown in the screenshot below, the artifact is downloaded and then deployed to GitHub Pages. Our CI/CD workflow is completed.
Bonus: Status Badge!
As an optional step, we can add a status badge in our repository's README.md file to indicate whether a workflow has successfully run. The format of the reference will be:
https://github.com/<OWNER>/<REPOSITORY>/actions/workflows/<WORKFLOW_FILE>/badge.svg
For example, here's how I add mine to my README.md file:

And voilà! Looks exactly as expected. You can easily monitor your automated workflows with these simple badges.

To be Continued: The Finale
Congratulations! We have built an automated CI/CD pipeline in our workflow using GitHub Actions. Please visit this repo to review what we have built today. We are now getting pretty good at GitHub Actions, aren't we?
But there's one more thing that I promised you would learn at the end of this series. And that is how to build your own custom action. Up till now, we have been using actions from the marketplace, so in the next part, we will learn how to build our own action and use it in our workflow.
Thanks for reading part 4! I hope it has been a helpful read. Please leave any questions or comments below. Don't forget to like and share the article if it helps you in any way. Feel free to read the provided documentation in the References section below. Stay curious, cheers!


