


Automate GitHub: Build a CLI App with Node.js #1
Let's build a CLI app with Node.js to automate GitHub workflow in this step-by-step tutorial! (Part 1)


At the end of this 2-part tutorial, you will have a simple CLI tool that can automate the process of pushing a local git repository to your GitHub.
As you all know, creating a new remote repository on GitHub requires the following steps:
- Login to your Github account
- Click on New Repository and enter the details
git initin your local repo- Optional: Create
.gitignorefile and add the files to ignore git add <file>git commit -m "Initial commit"git remote add origin <url>git push -u origin master
Instead of having to go through these 7-8 steps every time you want to push a new project on GitHub, let's build a tool to automate this process.
Prerequisites/ Tools Needed
- Beginner experience with Node.js and JavaScript
- Node and npm installed
- For Windows: Git, Git Bash installed
- Code Editor software installed
Step 1: Set up a Node.js project
Initialize and create package.json file by running:
mkdir cli-app
cd cli-app
npm init
Then run the code below to install the dependencies we will need for this project:
npm install figlet chalk clear @octokit/rest commander inquirer configstore simple-git glob
Brief explanation of the dependencies:
figlet: allow writing big text on terminalchalk: allow styling terminal words with coloursclear: to clear terminal screen via JavaScript@octokit/rest: GitHub REST API client for JavaScriptcommander: allows execution of commands to terminalinquirer: more flexible option thanreadlinemodule, enables terminal to ask questions and accept answersconfigstore: store token securely for reusesimple-git: simplify running git commands in Node.jsglob: easily retrieve all files in a directory as an array
Step 2: Create files
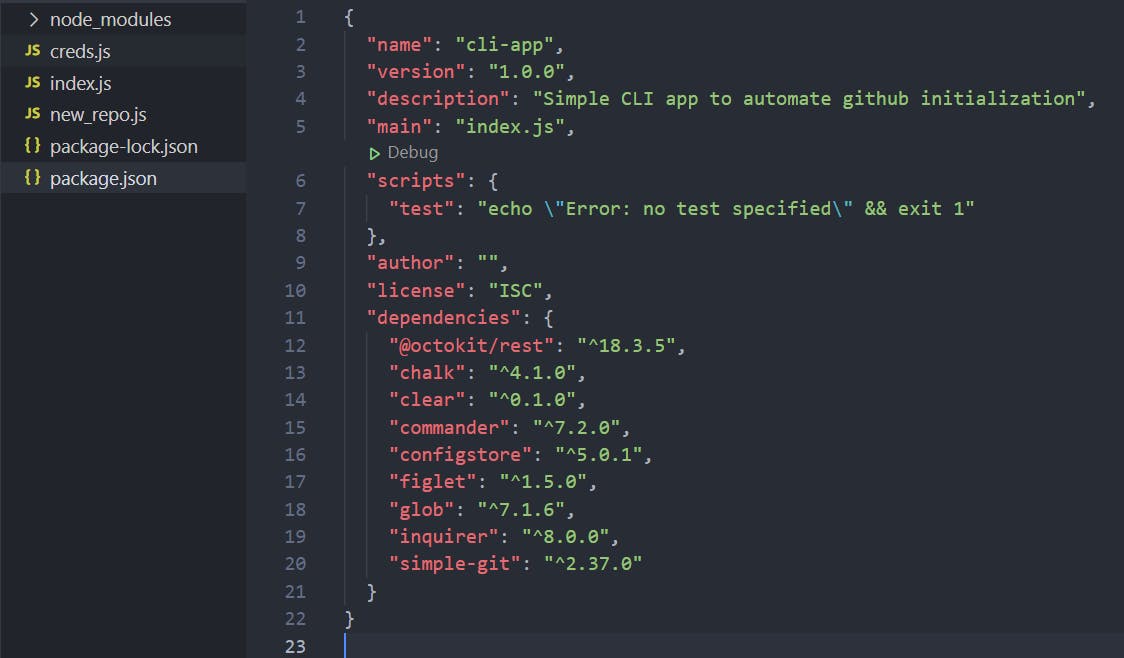
Build our app directory by creating these files in the root directory:
- index.js: Where app initializes and listens for input in the terminal
- creds.js: GitHub authentication functions
- new_repo.js: To create a new repo functions
At this point, your app directory and package.json should look like:
Step 3: Index.js
This is where our app will start. First, let's import the dependencies we need here:
const app = require('commander');
const chalk = require('chalk');
const clear = require('clear');
const figlet = require('figlet');
const inquirer = require('inquirer');
Now let's create an init command, which means our app will start when the user types node index.js init on the terminal. This is where our dependency commander comes in.
We can use the command() method to create the init command. Then add a description to our command with description() and finally, the action() method takes care of what this command will do (i.e. show a welcome message).
In code:
app.command('init')
  .description('Run CLI tool')
  .action(async() => {
      //show welcome message
     console.log("Welcome to the GitHub initializer tool");
})

app.parse(process.argv); //get the arg (i.e. init)

//show help if no arg is passed
if (!app.args.length) {
    app.help();
}
Let's run the node index.js init and see the result.
Great! That's worked perfectly. But isn't the UI quite boring? Let's use figlet and chalk to beautify it. Here's what I have inside actions() now.
clear(); //clears the terminal

//display app title
console.log(chalk.magentaBright(
figlet.textSync('CLI App Tutorial', { horizontalLayout: 'full' })));

//show welcome message
console.log("Welcome to the GitHub initializer tool.\nThis tool is built for a tutorial at "
    + chalk.yellow("https://lo-victoria.com")+ ". Do check out her blog! ^^");
Let's run node index.js init again. It looks way better now, isn't it?
There's another thing that we can improve on. We can add a start script in package.json so that we don't have to type node index.js init on the terminal every time we want to start our app. We can type npm start instead.
In package.json under scripts:
"scripts": {
    "test": "echo \"Error: no test specified\" && exit 1",
    "start": "node index.js init" //add this line
}
Back to index.js, after showing our welcome message to the user, we should prompt if they want to proceed to create a remote repo.
To do that, we must first create a question array with the an object like this:
const question = [{
    name: 'proceed',
    type: 'input',
    message: 'Proceed to push this project to a Github remote repo?',
    choices: ['Yes', 'No'],
    default: 'Yes'
}];
As you can see above, the object has self-explanatory properties such as name, type and message. Since this is a yes/no question, we also add a choices property and default the answer as 'Yes'.
Now we shall use our inquirer dependency to prompt the question like so:
const answer = await inquirer.prompt(question);

if(answer.proceed == "Yes"){
   //proceed with Github authentication, creating the repo, etc.
    console.log(chalk.gray("Authenticating..."))
}else{
    //show exit message
    console.log(chalk.gray("Okay, bye."))
}
And this is what our app look like so far.
If the user's answer is 'Yes', the next step is to allow the user to authenticate their GitHub from this tool. Let's write the authentication logic in creds.js.
Step 4: Generate a Token
In creds.js, we will prompt the user to enter their personal access token to authenticate their GitHub.
To learn more about different authentication strategies, please read their documentation.
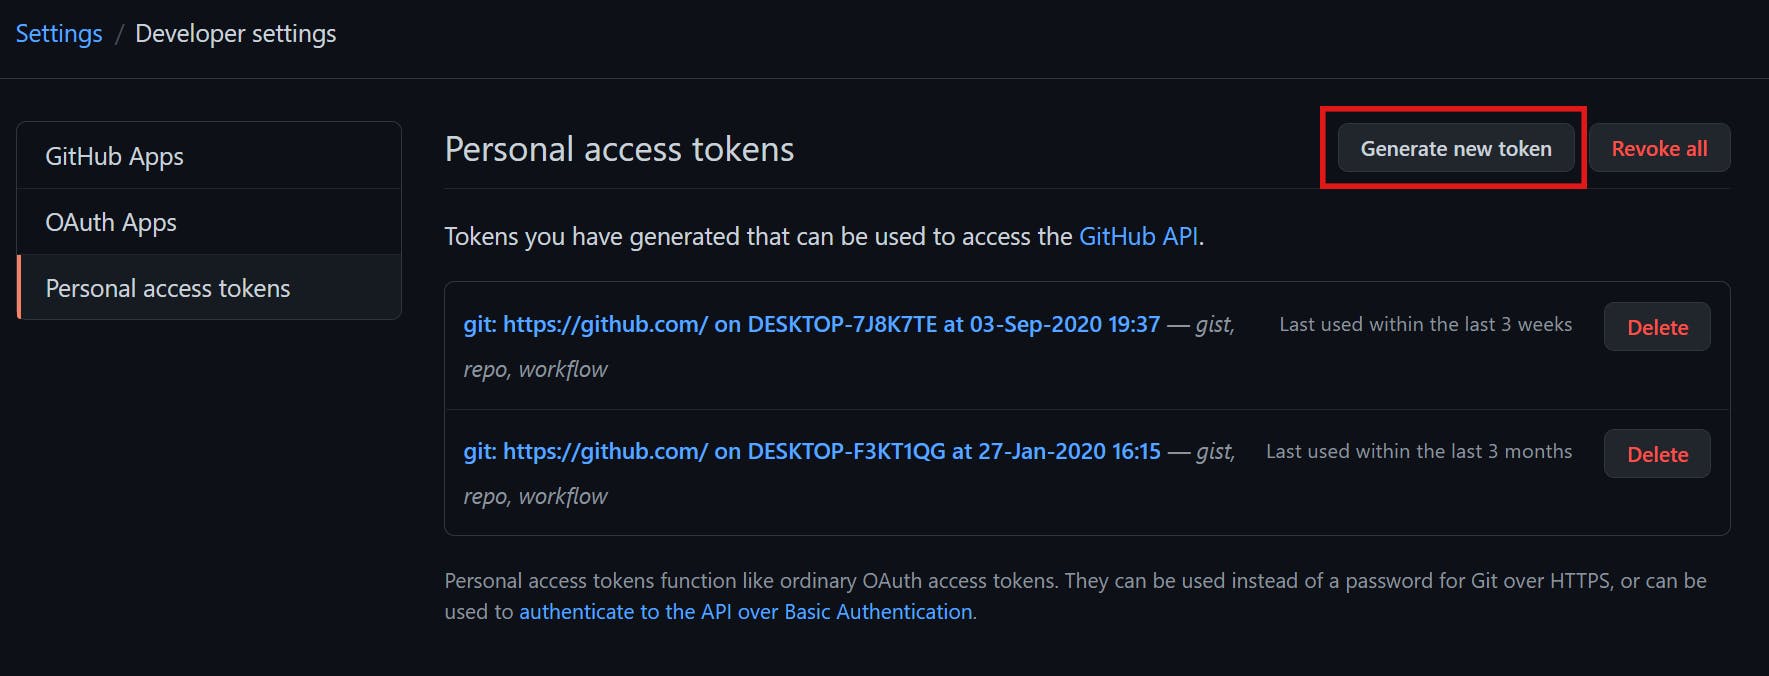
To generate a token, login to your GitHub account. Go to Settings > Developer Settings > Personal Access Token. Click on 'Generate new token'.
Then enter the description of the token and check the 'repo' checkbox under Scopes as shown below.
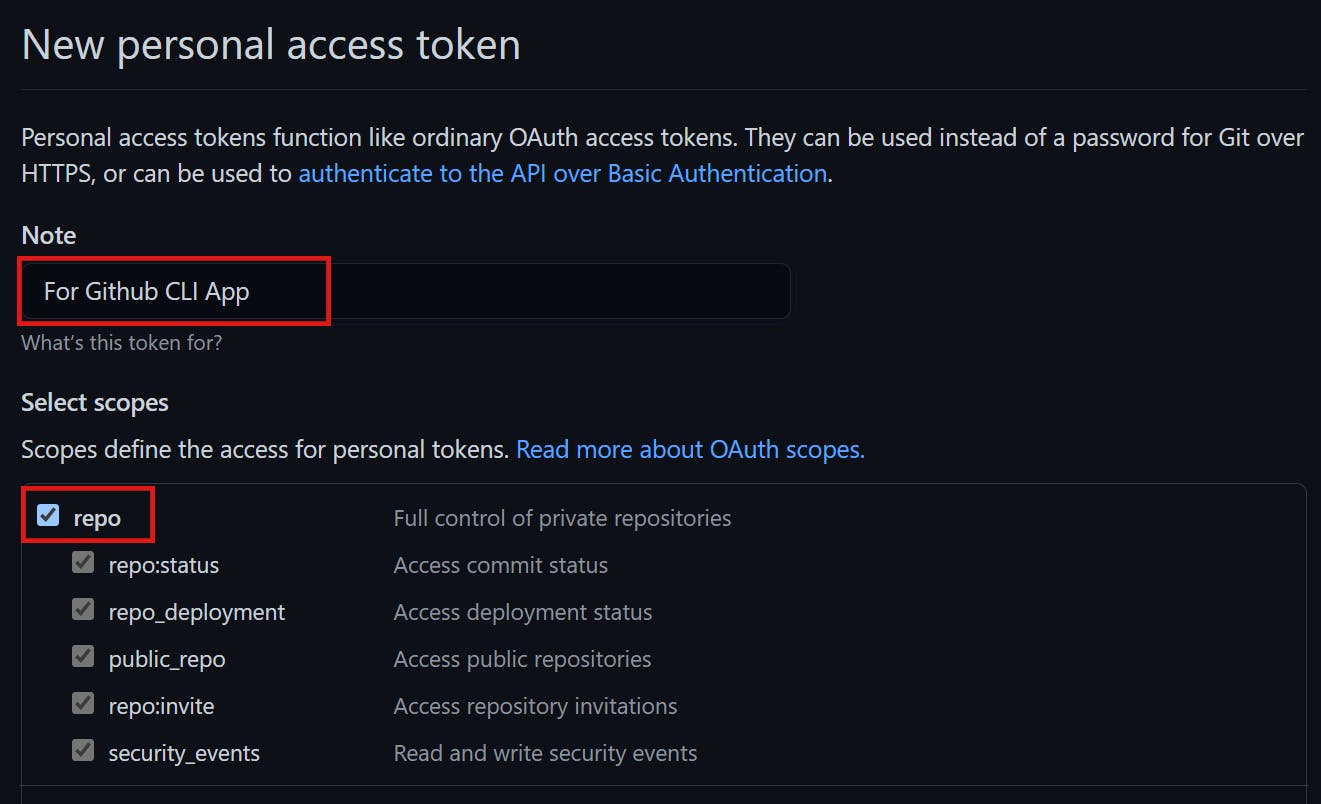
Scroll down and click 'Generate token'. You will be redirected to this page below.
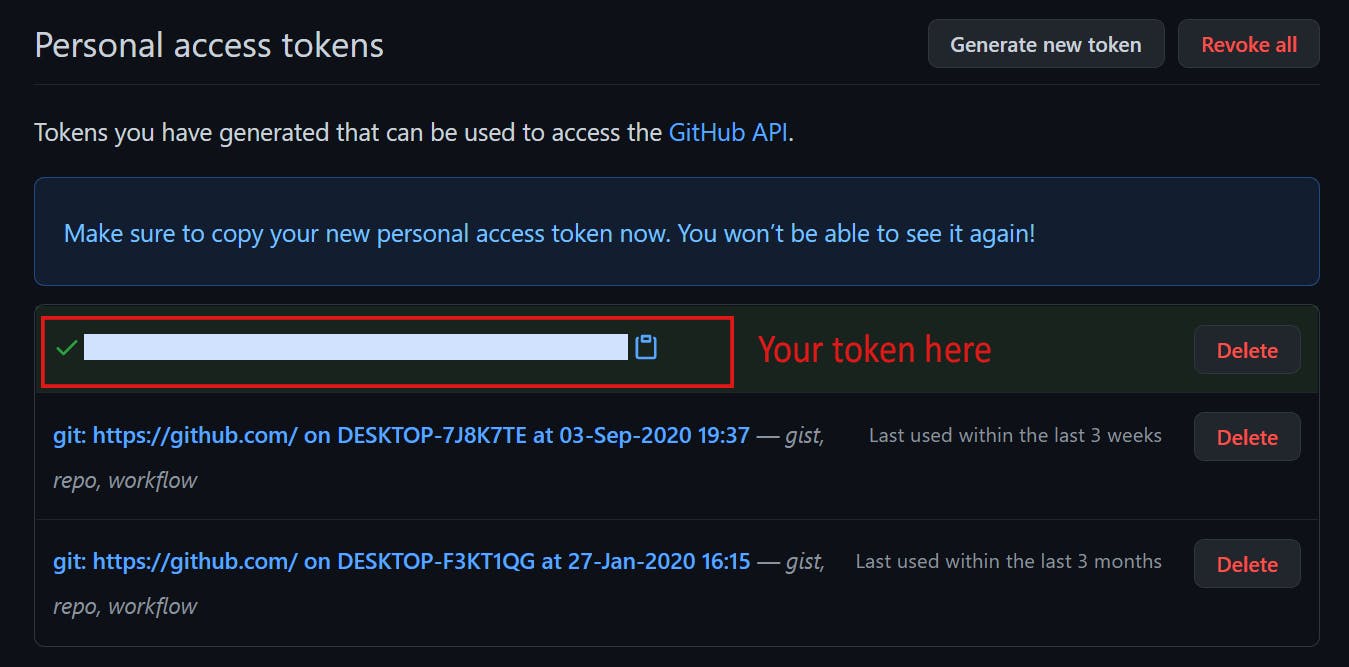
Make sure you copy and save this token somewhere safe because once you leave the page, you will not be able to retrieve your token again. If you forgot to save it somewhere and lose it, you'll have to delete and re-generate a new token.
Step 5: Creds.js
Now that we have our token, let's head to creds.js to prompt and authenticate a user in the terminal. We shall use inquirer and octokit, which we installed earlier. Let's import it at the top in creds.js.
const inquirer = require('inquirer');
const { Octokit } = require("@octokit/rest");
Now let's create a function called authenticate to prompt the user's token and authenticate them.
async function authenticate(){
  //1. create question
   const question = [{
       name: 'token',
       type: 'input',
       message: 'Enter your Github personal access token.',
       validate: function(value) {
          if (value.length == 40) {
              return true;
           } else return 'Please enter a valid token.';
        }
   }];
   //2. prompt question
   const answer = await inquirer.prompt(question);

   //3. try authenticating with user's answer
   try{
      const octokit = new Octokit({
        auth: answer.token,
      });
      return octokit;
   //4. print error if any
   }catch (error){
      console.log(error);
   }
}

//5. export for use in index.js
module.exports = {authenticate}
Let's test our function. First, import it into index.js so we can run it there.
//Add this line at the top of index.js
const auth = require('./creds');
Then, call the authenticate() function in the init command.
app.command('init')
    .description('Run CLI tool')
    .action(async() => {
        //welcome message - see step3
        //prompt question - see step3

        if(answer.proceed == "Yes"){
            console.log(chalk.gray("Authenticating..."))
            const octokit = await auth.authenticate(); //add this line
        }else{
            console.log(chalk.gray("Okay, bye."))
        }
    })
Let's run npm start to test this quickly. Paste the token you generated in Step 4 when prompted. You can test with random values to see if the inquirer validation works.
Great, we have created a simple authentication prompt for our app. However, having to copy the token and paste it every time the app prompts for it can be tedious. Also, what if we lose or misplace our token after some time?
Let's use the configstore dependency to persist our token and enable our app to not prompt for a token if it is stored in config.
Step 6: Configstore
First, import and initialize it at the top of creds.js.
const Configstore = require('configstore');
const packageJson = require('./package.json');

// Create a Configstore instance
const config = new Configstore(packageJson.name);
Now let's revise our authenticate function to check if we have stored a token in our config.
If it exists, we simply authenticate with that token. If not, we will prompt the user for the token then authenticate with the user's answer and store it in config for next time.
Here's our revised authenticate function.
async function authenticate(){
   //1. try getting a token
   let token = config.get('github_token');
   //2. if it exists, authenticate with it
   if(token){
     console.log("Token is found in config. Skipping prompt.")
      try{
         const octokit = new Octokit({
           auth: token,
          });
          return octokit;
      }catch (error){
        throw error;
      }
   }else{
  //3. if no token is stored, prompt user for one
   const question = [{
       name: 'token',
       type: 'input',
       message: 'Enter your Github personal access token.',
       validate: function(value) {
          if (value.length == 40) {
              return true;
           } else return 'Please enter a valid token.';
        }
   }];
   const answer = await inquirer.prompt(question);

   //4. authenticate with user's answer
   try{
      const octokit = new Octokit({
        auth: answer.token,
      });
      //5. store the token for next time
      config.set('github_token', answer.token);
      return octokit;
   }catch (error){
      console.log(error);
   }
}
As shown in the clip below, upon the 2nd time we run the app, it won't ask for the token anymore because it is now stored in config.

Conclusion
Today we have learnt how to built a simple CLI tool that:
- displays a fancy welcome message
- ask the user questions
- gets the user's answers
- authenticates a user via their GitHub personal access token
- stores the token for future use
In the next part of the article, we shall complete this app by adding the following capabilities:
- create a new remote repo for the authenticated user
- create a
.gitignorefile - allows user to select files to ignore
- initializes and commits the rest of the files
- pushes the local repo to GitHub
- displays a success message
Thanks for reading this long tutorial. I hope you find it both interesting and helpful. Do like and share the article around, and feel free to ask any questions in the comments below. Please refer to the Resources section to learn more about the different dependencies we have used for the app. Stay tuned for the next part! Cheers!